Love this? Save it for later!
Share the inspiration with your friends
The game was supposed to start in forty-five minutes and I was standing in my kitchen staring at three avocados that were either perfectly ripe or already ruined—there was no in-between with those things. My cousin had texted me an hour ago saying she was bringing her new boyfriend who was “really into football” which apparently meant I needed to step up my snack game beyond the usual bag of chips and store-bought salsa. I had a block of cream cheese, a can of refried beans I couldn’t even remember buying, and a bag of shredded Mexican blend cheese that was probably fine. That’s when it hit me—I had everything for a seven layer dip except the guacamole, and those avocados were begging to be used.
So I just went for it. I mashed those avocados with a fork (not gracefully, I’ll admit), squeezed a lime in there, and started layering everything in my grandmother’s old glass baking dish. The refried beans went down first, then the guacamole, then the sour cream mixed with taco seasoning, and before I knew it I had this beautiful tower of dip that looked way more impressive than the fifteen minutes of work it actually took. My cousin’s boyfriend ate half of it by himself and asked for the recipe before he even said goodbye. That’s the thing about this best seven layer football dip with guacamole—it makes you look like you planned ahead when really you just got lucky with some avocados and a little bit of desperation. I’ve been making it for every game day since, and honestly, it never lasts past the first quarter.
Why You’ll Love This Recipe
This isn’t just another dip recipe you’ll scroll past. I’ve tested this version about a dozen times to get the ratios exactly right, and let me tell you—there’s a science to making sure every scoop gets a little bit of every layer. No one wants to dig to the bottom for the beans while everyone else gets the good stuff on top.
- Game Day Hero : This dip feeds a crowd without any last-minute fuss. You can assemble it hours ahead and just pull it out when the pre-game shows start.
- No Cooking Required : Unless you count microwaving the refried beans for thirty seconds, there’s zero heat involved. Perfect for keeping your kitchen cool or when you’re already using the oven for wings.
- Budget-Friendly : Most of these ingredients cost pennies per serving. The guacamole is made from scratch with just a few avocados, so you’re skipping the expensive store-bought stuff.
- Totally Customizable : Leave out the beans, swap the cheese, add jalapeños—this recipe bends to whatever you have in your fridge.
- Always the First Empty Dish : I’ve brought this to potlucks, Super Bowl parties, and even a casual backyard barbecue. It disappears faster than anything else on the table.
What makes this version different from every other seven layer dip you’ve had is the homemade guacamole. Most recipes use plain mashed avocado or worse—guacamole from a tub that’s turned brown on top. Taking five extra minutes to make fresh guacamole with lime juice, cilantro, and a pinch of cumin transforms the whole thing. It’s the difference between a dip that’s fine and one that makes people hover around the bowl asking who made it. This is the kind of recipe that feels like comfort food—familiar, satisfying, and somehow exactly what you wanted even if you didn’t know it.
What Ingredients You Will Need
This recipe uses simple, mostly pantry-stable ingredients that come together to create something way bigger than the sum of its parts. Here’s everything you’ll need, broken down by layer so you can see how it all stacks up.
For the Refried Bean Layer
- 1 can (16 ounces) refried beans (I prefer Rosarita or Old El Paso for the creamiest texture)
- 1/2 teaspoon ground cumin
- 1/4 teaspoon garlic powder
- 1 tablespoon water or reserved bean liquid (helps thin it out for spreading)
For the Guacamole Layer
- 3 large ripe avocados (they should give slightly when you press them, like a firm handshake)
- 1/2 small red onion, finely diced (about 1/4 cup)
- 1 medium Roma tomato, seeded and diced
- 1/4 cup fresh cilantro, chopped (stems included—they have flavor too)
- Juice of 1 large lime (about 2 tablespoons)
- 1/2 teaspoon salt (start with less and adjust)
- 1/4 teaspoon ground cumin (trust me on this one)
- 1 small jalapeño, seeded and minced (optional, but recommended)
For the Sour Cream Layer
- 1 cup sour cream (full-fat works best, but Greek yogurt is a solid swap)
- 1 packet (1 ounce) taco seasoning mix (or 2 tablespoons homemade blend)
For the Remaining Layers
- 1 cup shredded Mexican blend cheese (or cheddar, or Monterey Jack—whatever melts your heart)
- 1/2 cup black olives, sliced (from a can, drained well)
- 1 cup pico de gallo or fresh salsa (drain off excess liquid so it doesn’t make the dip watery)
- 1/4 cup green onions, sliced (the green parts mostly, for color and mild onion bite)
A few notes on ingredient selection—I always buy the block of cheese and shred it myself because the pre-shredded stuff has anti-caking agents that don’t melt as nicely. For the avocados, look for ones that are dark green to almost black with slight give when you press near the stem. If they’re rock hard, leave them on the counter for a day or two. If they’re mushy, put them back and try again. And please don’t skip the cumin in the guacamole—it adds this warm, earthy note that makes people ask “what’s in this?” without being able to pinpoint it.
Equipment Needed
You don’t need anything fancy for this recipe, which is part of its beauty. Here’s what you’ll want to have on hand:
- A 9×13-inch baking dish or glass serving dish—this size gives you plenty of surface area for dipping without the layers being too thin. A pie plate works in a pinch if you’re making a smaller batch.
- A sharp chef’s knife—dicing onions and tomatoes goes so much faster when your knife is actually sharp. I learned this the hard way after nearly losing a fingertip to a dull blade.
- A cutting board (preferably one with a groove to catch juices)
- A fork or potato masher—for mashing the avocados. A fork works fine, but if you make guacamole a lot, a wooden masher is worth the ten bucks.
- A medium mixing bowl—for the guacamole
- A small mixing bowl—for the sour cream mixture
- A rubber spatula—for spreading layers evenly without disturbing the one below it
- Measuring spoons—though honestly, I eyeball most of this stuff after making it so many times
If you don’t have a 9×13 dish, a deep pie plate or even a large cast iron skillet works beautifully. Just adjust the layering order to fit whatever vessel you’re using. And if you’re taking this to a party, a glass dish with a tight-fitting lid is ideal so you can transport it without everything sliding around.
Preparation Method
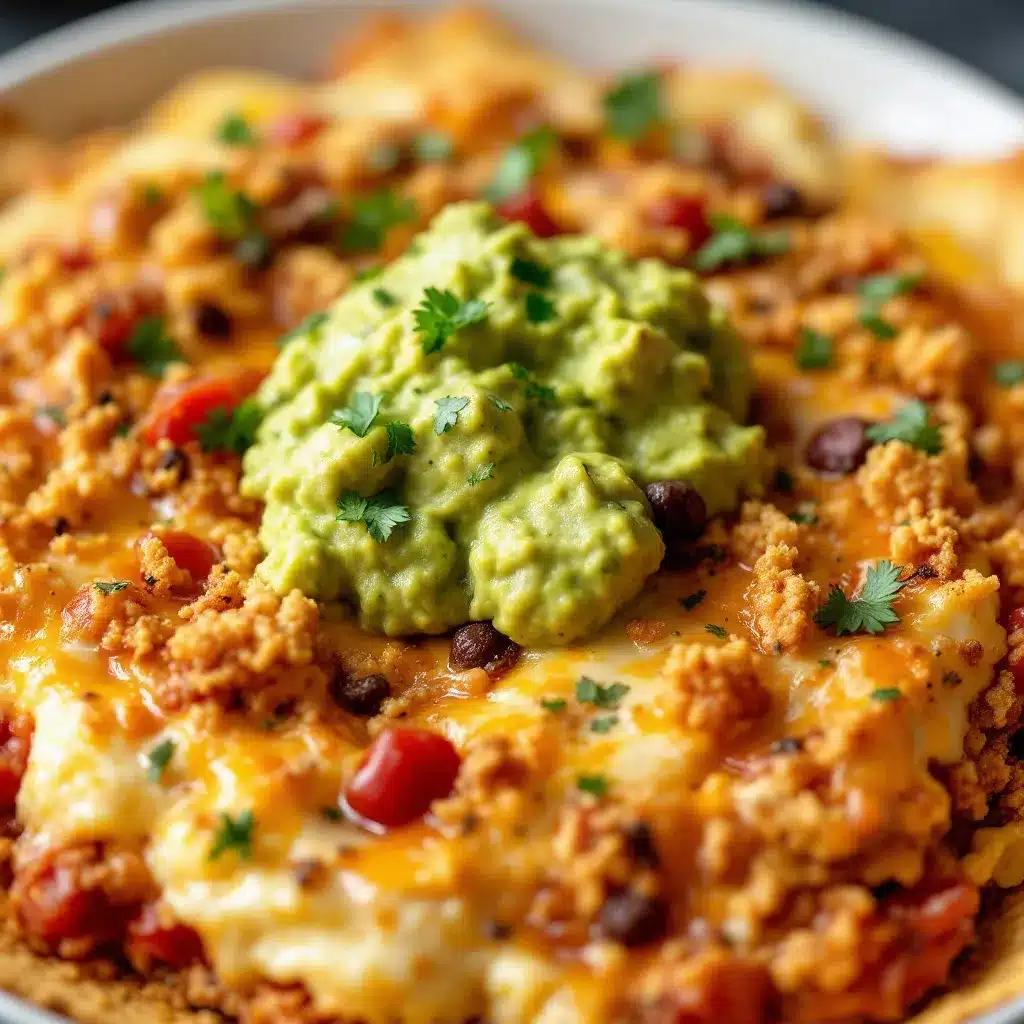
This comes together in about 20 minutes flat, and most of that time is just dicing vegetables. Here’s how to build the perfect seven layer dip.
Step 1: Prep Your Ingredients
Dice the red onion, tomato, and jalapeño (if using). Chop the cilantro and slice the green onions and black olives. Having everything ready to go before you start layering makes the process so much smoother. Trust me, you don’t want to be chopping onions while your guacamole sits and oxidizes.
Step 2: Make the Refried Bean Base
Empty the can of refried beans into a small microwave-safe bowl. Add the cumin, garlic powder, and a tablespoon of water. Microwave for 30-45 seconds, then stir until smooth and spreadable. The beans need to be warm and loose so they spread easily without pulling up when you add the next layer. Spread them evenly across the bottom of your 9×13 dish using the back of a spoon or a rubber spatula.
Step 3: Make the Guacamole
Cut the avocados in half, remove the pits, and scoop the flesh into a medium bowl. Add the lime juice, salt, and cumin, then mash with a fork until it’s as chunky or smooth as you like. I prefer it slightly chunky with some texture remaining. Fold in the diced onion, tomato, cilantro, and jalapeño if using. Taste and adjust salt or lime juice as needed. Spread this gently over the bean layer, being careful not to mix the two together.
Step 4: Make the Seasoned Sour Cream
In a small bowl, stir together the sour cream and taco seasoning until fully combined and uniformly orange. Spread this over the guacamole layer. This layer acts as a barrier that helps prevent the guacamole from browning too quickly—bonus!
Step 5: Add the Remaining Layers
Sprinkle the shredded cheese evenly over the sour cream layer. Top with the sliced black olives, then spoon the pico de gallo or salsa over the top (drain it first so you’re not adding liquid). Finish with a scattering of green onions for color and fresh onion flavor.
Step 6: Chill and Serve
Cover the dish tightly with plastic wrap and refrigerate for at least 30 minutes before serving. This resting time lets the flavors meld together and makes the dip easier to scoop without everything sliding around. Serve with tortilla chips, scoop-style chips, or even sliced bell peppers and cucumber rounds for a lower-carb option.
A few visual cues to watch for—the guacamole should be bright green with flecks of red and white from the tomato and onion. If it starts looking brown around the edges, you’ve waited too long to cover it. The layers should be distinct but not perfectly straight—this is homemade food, not a geometry project. And when you scoop into it, every chip should come up with a little bit of everything. That’s the sign of a well-built dip.
Cooking Tips & Techniques
After making this dip more times than I can count, I’ve picked up a few tricks that make a real difference. Here’s what I wish someone had told me when I first started making layered dips.
Layer in the Right Order
The order matters more than you think. Beans on the bottom create a sturdy base. Guacamole next, then sour cream—the sour cream acts as a sealant that keeps air away from the guacamole and prevents browning. Cheese and toppings go on last so they stay visible and fresh-looking.
Drain Everything
Wet ingredients are the enemy of a good layered dip. Drain your salsa or pico de gallo in a fine-mesh strainer before adding it. Pat your black olives dry with a paper towel. Even the refried beans benefit from being warmed and stirred, which releases excess moisture. A watery dip is a sad dip, and it’s almost always because someone skipped the draining step.
Make It Ahead
This dip actually improves after a few hours in the fridge. The flavors meld together and the layers set up nicely. You can assemble it up to 24 hours in advance, just wait to add the green onions and any fresh toppings until right before serving so they stay bright and crisp.
Keep It Cold
If you’re serving this at a party, set the dish on a bed of ice or use a chilled serving platter. Nobody wants lukewarm sour cream. I’ve used a shallow baking dish nested inside a larger dish filled with ice, and it works like a charm for hours.
One Mistake I Made
The first time I made this, I used pre-shredded cheese and the whole thing turned into a greasy mess. The anti-caking agents in bagged cheese don’t melt well, and they left an odd powdery texture on top. Shredding your own cheese takes two extra minutes and makes a noticeable difference. Also, I once forgot to drain the salsa and ended up with pinkish liquid pooling around the edges of the dish. Learn from my failures—drain your salsa.
Variations & Adaptations
This recipe is endlessly adaptable, which is one of the reasons I keep coming back to it. Here are some of my favorite variations.
Spicy Southwest Version
Add a can of drained and rinsed black beans to the refried bean layer for extra texture and fiber. Mix a finely chopped chipotle pepper in adobo sauce into the sour cream layer for smoky heat. Top with pickled jalapeños instead of fresh for a tangier kick. This version is my go-to when I’m craving something with more fire.
Healthy-ish Twist
Use Greek yogurt instead of sour cream (plain, full-fat works best). Swap the refried beans for a layer of seasoned black beans or pinto beans. Load up on extra vegetables—shredded lettuce, diced bell peppers, even some corn kernels. Skip the cheese or use a reduced-fat version. It’s still indulgent, but you’ll feel better about going back for thirds.
Meat Lover’s Version
Add a layer of seasoned ground beef or shredded chicken between the beans and guacamole. Brown a pound of ground beef with taco seasoning, let it cool slightly, then spread it over the beans. This turns the dip into a full meal and is always a hit with the carnivores at the party. For an even easier option, crumble cooked chorizo on top before adding the cheese.
Dairy-Free Adaptation
Use dairy-free sour cream (I like the brand Forager Project or Tofutti) and omit the cheese or use a plant-based shred. The guacamole is already dairy-free, and the beans are naturally vegan. This version works beautifully for gatherings with mixed dietary needs—just make sure to label it so everyone knows what’s safe.
I’ve personally tried the spicy Southwest version about five times now, and it’s become my standard for fall football parties. Something about the smoky heat just feels right when the weather turns cool and you’re huddled around the TV.
Serving & Storage Suggestions
This dip is best served cold or at room temperature, straight from the fridge with a pile of sturdy tortilla chips. Scoop-style chips are ideal because they can hold a generous amount without breaking. If you’re feeling fancy, serve it alongside some loaded nachos for a serious game day spread.
For presentation, I like to garnish the top with a few extra cilantro leaves, a sprinkle of smoked paprika, and maybe some pickled jalapeño slices arranged in a little pattern. It takes ten seconds and makes the dish look like you actually tried.
This dip pairs beautifully with creamy slow cooker chorizo queso for a double-dip situation that will have your guests talking. Add some mummy hot dogs if you’re feeling playful, or keep it classic with just chips and dip.
Storage: Cover tightly with plastic wrap or transfer to an airtight container and refrigerate for up to 3 days. The guacamole may brown slightly on top, but the sour cream layer helps protect it. If you’re storing leftovers, press a piece of plastic wrap directly onto the surface of the dip before covering the dish—this minimizes air exposure and keeps everything fresher longer.
Reheating: Honestly, this dip is meant to be served cold. If you absolutely must reheat it, scoop out individual portions and microwave for 15-20 seconds. The cheese will melt slightly and the beans will warm up, but the guacamole does not microwave well. Cold or room temperature is the way to go.
Make-Ahead Note: The flavors actually get better after a day in the fridge. Just hold off on the fresh garnishes until you’re ready to serve. I’ve made this the night before a party and it was even better than when I first assembled it.
Nutritional Information & Benefits
Here’s an approximate breakdown per serving (based on 12 servings, with tortilla chips not included):
- Calories: 210
- Total Fat: 16g
- Saturated Fat: 6g
- Cholesterol: 25mg
- Sodium: 480mg
- Total Carbohydrates: 12g
- Dietary Fiber: 5g
- Sugars: 3g
- Protein: 7g
This dip actually has some surprising health benefits hidden beneath all that deliciousness. Avocados are packed with heart-healthy monounsaturated fats and fiber, which help keep you full and satisfied. The beans add plant-based protein and even more fiber, while the tomatoes and cilantro provide antioxidants and vitamins A and C. The sour cream and cheese offer calcium and protein, though obviously this isn’t a health food—it’s a game day indulgence that happens to have some redeeming qualities.
If you’re watching your sodium, use low-sodium refried beans and skip the taco seasoning in favor of your own spice blend. You can also reduce the cheese and sour cream for a lighter version without sacrificing too much flavor. And if you’re gluten-free, this recipe is naturally safe as long as your taco seasoning doesn’t contain wheat-based fillers.
Conclusion
This best seven layer football dip with guacamole is the kind of recipe that becomes a tradition. It’s the dish people ask you to bring to every party, the one that disappears before halftime, the one that makes you look like you spent hours in the kitchen when really you just threw some stuff in a dish and let it do its thing. I’ve made this for Super Bowls, birthday parties, casual Friday nights, and even a few times when I just wanted an excuse to eat guacamole with a spoon.
What I love most about this recipe is how forgiving it is. You can swap ingredients, adjust the spice level, add layers, take layers away, and it still works. It’s built for improvisation, which is exactly what cooking should be. So go ahead and make it your own—add some corn, swap the cheese for pepper jack, throw in some bacon bits if that’s your thing. The only rule is that every scoop should have a little bit of everything, and nobody should leave hungry.
I’d love to hear how yours turns out. Drop a comment below and tell me what variations you tried, or tag me in your photos if you share them online. And if you’re looking for more game day inspiration, don’t miss my bacon wrapped smokies or these football shaped stuffed bell peppers for the ultimate party spread. Happy dipping, friends!
Frequently Asked Questions
Can I make this dip ahead of time?
Yes! You can assemble the entire dip up to 24 hours in advance. Just wait to add the fresh garnishes like green onions and extra cilantro until right before serving. Cover tightly with plastic wrap and refrigerate.
How do I keep the guacamole from turning brown?
The sour cream layer acts as a barrier that helps prevent oxidation. Pressing plastic wrap directly onto the surface of the dip before refrigerating also helps. Adding extra lime juice to the guacamole slows down browning too.
Can I freeze seven layer dip?
I don’t recommend freezing this dip. The sour cream and guacamole will separate and become watery when thawed, and the texture won’t be the same. It’s best made fresh or within a day of serving.
What chips go best with this dip?
Sturdy scoop-style tortilla chips are your best bet. They can hold a generous amount of dip without breaking. Thick restaurant-style chips also work well. Avoid thin, delicate chips that will shatter under the weight of all those layers.
Can I use store-bought guacamole instead of homemade?
You can, but I really recommend making your own. Store-bought guacamole often has added preservatives and a different texture. Homemade takes five minutes and tastes significantly better. If you’re short on time, look for refrigerated guacamole in the produce section rather than shelf-stable versions.
Pin This Recipe!
Best 7 Layer Football Dip with Guacamole
This best seven layer football dip with guacamole is the ultimate game day snack that comes together in just 20 minutes. Layers of seasoned refried beans, fresh guacamole, tangy sour cream, cheese, and toppings create a crowd-pleasing dip that disappears before halftime.
- Prep Time: 20 minutes
- Cook Time: 0 minutes
- Total Time: 50 minutes
- Yield: 12 servings 1x
- Category: Appetizer
- Cuisine: Mexican-American
Ingredients
- 1 can (16 ounces) refried beans
- 1/2 teaspoon ground cumin
- 1/4 teaspoon garlic powder
- 1 tablespoon water or reserved bean liquid
- 3 large ripe avocados
- 1/2 small red onion, finely diced (about 1/4 cup)
- 1 medium Roma tomato, seeded and diced
- 1/4 cup fresh cilantro, chopped
- Juice of 1 large lime (about 2 tablespoons)
- 1/2 teaspoon salt
- 1/4 teaspoon ground cumin
- 1 small jalapeño, seeded and minced (optional)
- 1 cup sour cream
- 1 packet (1 ounce) taco seasoning mix
- 1 cup shredded Mexican blend cheese
- 1/2 cup black olives, sliced
- 1 cup pico de gallo or fresh salsa
- 1/4 cup green onions, sliced
Instructions
- Prep your ingredients: dice the red onion, tomato, and jalapeño (if using). Chop the cilantro and slice the green onions and black olives.
- Make the refried bean base: empty the can of refried beans into a small microwave-safe bowl. Add the cumin, garlic powder, and a tablespoon of water. Microwave for 30-45 seconds, then stir until smooth and spreadable. Spread evenly across the bottom of a 9×13-inch dish.
- Make the guacamole: cut the avocados in half, remove the pits, and scoop the flesh into a medium bowl. Add the lime juice, salt, and cumin, then mash with a fork until desired consistency. Fold in the diced onion, tomato, cilantro, and jalapeño if using. Taste and adjust salt or lime juice as needed. Spread gently over the bean layer.
- Make the seasoned sour cream: in a small bowl, stir together the sour cream and taco seasoning until fully combined. Spread over the guacamole layer.
- Add the remaining layers: sprinkle the shredded cheese evenly over the sour cream layer. Top with sliced black olives, then spoon the pico de gallo or salsa over the top (drained). Finish with a scattering of green onions.
- Cover the dish tightly with plastic wrap and refrigerate for at least 30 minutes before serving. Serve with tortilla chips.
Notes
Layer in the right order: beans on bottom, then guacamole, then sour cream (acts as a sealant to prevent browning). Drain all wet ingredients (salsa, olives) to avoid a watery dip. This dip improves after a few hours in the fridge; can be assembled up to 24 hours in advance. For best results, shred your own cheese instead of using pre-shredded. Serve cold or at room temperature.
Nutrition
- Serving Size: 1 serving (about 1/1
- Calories: 210
- Sugar: 3
- Sodium: 480
- Fat: 16
- Saturated Fat: 6
- Carbohydrates: 12
- Fiber: 5
- Protein: 7
Keywords: seven layer dip, football dip, guacamole dip, game day dip, layered dip, party dip, Super Bowl dip


