Love this? Save it for later!
Share the inspiration with your friends
This was supposed to be just a simple vanilla cheesecake. I had my mind set on a classic dessert for the Fourth of July potluck, nothing fancy. I grabbed the cream cheese, sugar, and eggs, and honestly, I was already running late. Then, I realized I’d forgotten the springform pan at home, and the oven was acting up—too hot, too uneven. I was halfway panicking, trying to figure out how to salvage the whole thing with my tiny muffin tin and some leftover berries sitting on the counter.
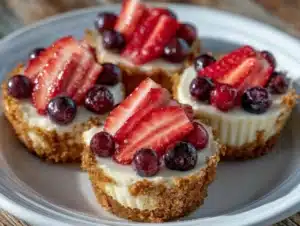
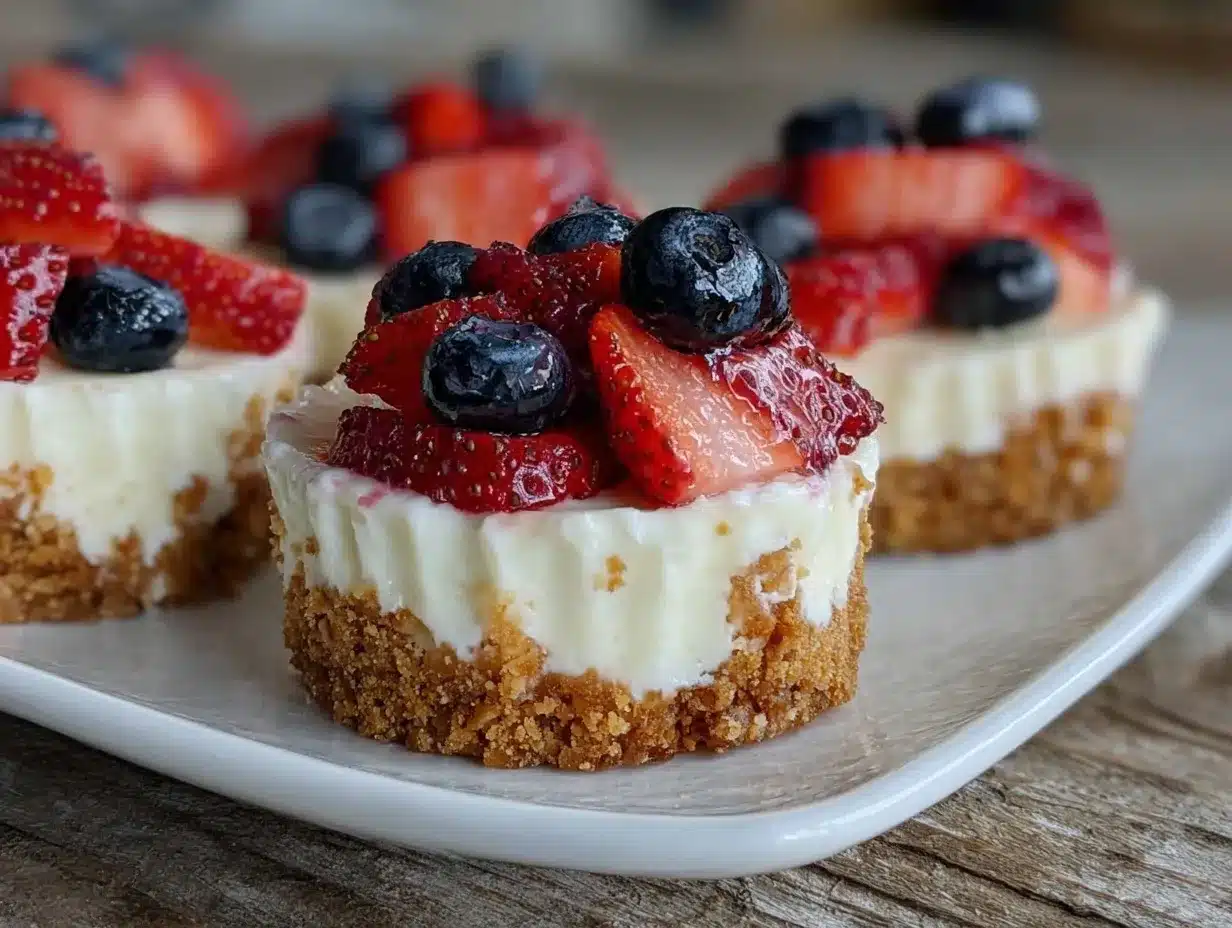
So, I improvised. Instead of one big cake, I layered red strawberries, white creamy cheesecake, and blue blueberries in mini cups. The oven drama forced me to bake them faster, which actually gave the crust a surprising crunch. It was nothing like the smooth, classic cheesecake I’d planned, but honestly, it was so much better. The colors popped, the texture was fun, and every bite was a celebration in itself.
Maybe you’ve been there—scrambling, forgetting something, and feeling like the kitchen’s winning. But this recipe? It stuck with me. I keep making these Perfect Red White and Blue Mini Cheesecake Cups because they’re easy, festive, and somehow comforting even when the day’s a mess. Let me tell you, these mini cheesecakes have saved more than one holiday gathering, and I’m betting they’ll do the same for you.
Why You’ll Love This Recipe
I’ve tried my share of patriotic desserts, but these mini cheesecake cups hold a special place in my recipe book. They’re not only visually stunning but truly a crowd-pleaser that’s as simple as they come. Here’s why you’ll want to make them for your next celebration:
- Quick & Easy: Ready in under 45 minutes, these mini cheesecakes are perfect for last-minute party prep or unexpected guests.
- Simple Ingredients: No need for fancy or hard-to-find items. You likely have cream cheese, berries, and graham crackers in your pantry already.
- Perfect for Any Occasion: Whether it’s the Fourth of July, Memorial Day, or a summer BBQ, these red white and blue treats bring festive fun to the table.
- Crowd-Pleaser: Kids and adults alike love the creamy texture combined with the fresh burst of berries.
- Unbelievably Delicious: The combo of crunchy crust, smooth cheesecake, and juicy fruit is just right — not too sweet, not too heavy.
This isn’t just another cheesecake recipe. The trick is blending cottage cheese with cream cheese for an ultra-smooth finish, and layering the berries so every cup looks like a mini flag. Honestly, it’s the kind of dessert that makes you close your eyes after the first bite and smile. It’s festive but fuss-free, and that balance is why it’s become my go-to for patriotic celebrations.
What Ingredients You Will Need
This recipe uses simple, wholesome ingredients to deliver bold flavor and satisfying texture without the fuss. Most are pantry staples, and you can swap a few based on what you have on hand.
- For the crust:
- 1 ½ cups graham cracker crumbs (about 10 full sheets, finely crushed) – I like using Honey Maid for a richer flavor
- 5 tablespoons unsalted butter, melted (adds richness and helps bind the crust)
- 2 tablespoons granulated sugar (balances the buttery crust)
- For the cheesecake filling:
- 16 oz (450g) cream cheese, softened to room temperature
- ½ cup (120g) cottage cheese, small-curd – this makes the texture ultra-smooth and light
- ¾ cup (150g) granulated sugar
- 2 large eggs, room temperature
- 1 teaspoon pure vanilla extract
- ¼ cup (60ml) sour cream (adds tang and creaminess)
- For the topping and layering:
- 1 cup fresh strawberries, hulled and roughly chopped (for the red layer)
- 1 cup fresh blueberries (for the blue layer)
- Optional: whipped cream for garnish
If fresh berries are out of season, frozen works fine—just thaw and drain excess liquid. For a gluten-free crust, swap graham crackers for almond flour or gluten-free cookies. If you prefer a dairy-free version, almond cream cheese and coconut yogurt can substitute, though texture shifts slightly. I usually pick my ingredients at my local farmer’s market on Saturdays when the berries are at their peak—makes a big difference!
Equipment Needed
- Mini muffin tin (12-cup size) – the perfect size for these cheesecake cups
- Paper or silicone cupcake liners (optional, but makes removal easier)
- Mixing bowls – at least two, one for crust and one for filling
- Electric mixer or hand mixer – for smooth, lump-free cheesecake filling
- Measuring cups and spoons – accuracy helps with texture
- Spatula – for scraping down the bowl and smoothing layers
- Food processor or plastic bag and rolling pin – to crush graham crackers if needed
If you don’t have a mini muffin tin, small glass jars or ramekins work well too, though baking time may vary. Personally, I’ve tried silicone liners and found they make cleanup easier, but regular paper liners are just fine. Keeping your tools clean and dry, especially the mixer beaters, really helps the filling come together nicely.
Preparation Method
- Prep the crust: Preheat your oven to 325°F (163°C). Line your mini muffin tin with cupcake liners or grease lightly. In a medium bowl, combine 1 ½ cups graham cracker crumbs, 5 tablespoons melted butter, and 2 tablespoons sugar. Mix until all crumbs are evenly moistened and hold together when pressed.
- Form the crust bases: Spoon about 1 tablespoon of the crust mixture into each muffin cup. Press firmly and evenly into the bottom using the back of a spoon or your fingers. Don’t skimp here—the crust should be compact to hold during baking. Bake for 7 minutes, then remove and let cool while preparing the filling.
- Make the cheesecake filling: In a large bowl, beat 16 oz cream cheese and ½ cup cottage cheese on medium speed until smooth and creamy, about 2 minutes. Add ¾ cup sugar and beat again until fully incorporated. One at a time, add 2 eggs, mixing well after each.
- Flavor and texture: Stir in 1 teaspoon vanilla extract and ¼ cup sour cream until just combined. Be careful not to overmix to avoid cracks during baking. The filling should be silky and slightly thick.
- Assemble cups: Spoon a small layer of chopped strawberries onto each crust. Then, carefully add cheesecake filling to about ¾ full, leaving room for topping. Finally, add a few blueberries on top for the signature red, white, and blue look.
- Bake: Place the tin on the middle rack and bake at 325°F (163°C) for 18–22 minutes. The centers should still jiggle slightly but not be liquid. Overbaking leads to cracks, so keep a close eye.
- Cool and chill: Let the mini cheesecakes cool at room temperature for 30 minutes. Then refrigerate for at least 3 hours or overnight. This step is crucial for the filling to set and flavors to meld.
- Serve: When ready, remove liners and garnish with whipped cream or extra fresh berries if desired. Serve chilled for the best texture and taste.
If your oven runs hot or uneven, rotate the pan halfway through baking. If cracks appear, don’t fret—adding a little whipped cream hides imperfections well. Also, if you want to speed things up, chilling the crust base a few minutes before baking can help it hold together better.
Cooking Tips & Techniques
Cheesecake can be intimidating, but with these little tricks, you’ll get it right every time.
- Room temperature ingredients: Always let your cream cheese, eggs, and sour cream come to room temp before mixing. It helps everything blend smoothly and prevents lumps.
- Don’t overmix: While it’s important to blend well, over-beating can incorporate too much air, causing cracks or a grainy texture.
- Crust compaction: Press your crust firmly and evenly. I’ve learned the hard way that a loose crust crumbles when you try to serve.
- Water bath alternative: For a no-fuss approach, these mini cups bake beautifully without a water bath. But if you want ultra-silky texture, try placing the muffin tin inside a larger pan filled halfway with hot water.
- Watch baking time: Since these are small, they cook faster than a full cheesecake. Start checking at 18 minutes to avoid overbaking.
- Berry prep: Drain any juice from thawed frozen berries to keep the cheesecake from becoming soggy.
- Storing tips: Keep cheesecakes refrigerated in an airtight container. They’re best within 3 days but can be frozen for up to a month.
Honestly, I’ve had my share of cracked tops and sunken middles, but these mini cups are forgiving. The berry layers help mask minor imperfections, and the single-serve size means everyone gets their perfect bite without fuss.
Variations & Adaptations
Feel free to customize this recipe to your taste or dietary needs:
- Dietary: Use gluten-free graham crackers or almond flour crust for gluten sensitivity. Swap dairy cream cheese with vegan cream cheese and coconut yogurt for a dairy-free option.
- Seasonal: In fall, try layering with pomegranate seeds and pear slices instead of berries for color and crunch.
- Flavor twists: Add lemon zest to the filling for a citrusy brightness. Or swirl in some strawberry puree for a red marble effect.
- Cooking methods: No oven? Try no-bake cheesecake cups by mixing gelatin or agar-agar into the filling and chilling until firm.
- Personal variation: Once, I mixed a bit of crushed peppermint into the crust for a festive winter party. It was unexpected but delicious!
Serving & Storage Suggestions
Serve these mini cheesecakes chilled, straight from the fridge, for the best creamy texture. They look fantastic arranged on a platter with extra fresh berries scattered around for color contrast. For an extra touch, a dollop of lightly sweetened whipped cream on top adds smoothness and flair.
Pair these cups with a light, sparkling lemonade or iced tea to balance the richness. They’re also a sweet finish after grilled dishes or picnic fare.
Store leftovers in an airtight container in the refrigerator for up to 3 days. You can freeze them for up to a month — just thaw overnight in the fridge before serving. The flavors actually deepen when chilled, making them even better the next day.
Nutritional Information & Benefits
Each mini cheesecake cup contains roughly 220 calories, with 12 grams of fat and 15 grams of protein, making it a moderately rich treat. The berries add antioxidants, vitamins C and K, and fiber, which help balance the indulgence.
Using cottage cheese in the filling lowers overall fat and adds protein, making this dessert a bit lighter than traditional cheesecakes. The graham cracker crust provides whole grain fiber, especially if you choose whole wheat or gluten-free options.
For those watching sugar intake, you can reduce the sugar slightly or swap for natural sweeteners like erythritol. Just keep in mind this may affect texture slightly.
Conclusion
These Perfect Red White and Blue Mini Cheesecake Cups are a celebration of happy kitchen accidents and simple ingredients coming together in a festive way. They’re easy to make, impressive to serve, and deliciously satisfying, which is exactly what you want for any celebration.
Feel free to tweak the berry layers or crust to match your preferences or what’s in season. Honestly, I love how forgiving and adaptable this recipe is—it’s become a reliable crowd-pleaser that’s saved me more than once.
Give these mini cheesecakes a try, and let me know how you customize them! Share your thoughts, photos, or any twists you’ve tried—I love hearing from fellow dessert enthusiasts. Here’s to tasty, stress-free celebrations filled with sweet moments and maybe a little kitchen chaos (but the good kind!).
FAQs
Can I make these mini cheesecake cups ahead of time?
Yes! They actually taste better after chilling overnight. Just keep them covered in the refrigerator until serving.
What if I don’t have a mini muffin tin?
You can use small ramekins or glass jars. Baking time might be a bit longer, so watch for a slight jiggle in the center to know when they’re done.
How do I prevent cracks in the cheesecake filling?
Don’t overmix the batter and avoid overbaking. Also, letting the cheesecakes cool gradually helps. You can cover them loosely with foil if the tops brown too fast.
Can I use frozen berries for this recipe?
Absolutely. Just thaw them fully and drain excess juice before layering to prevent sogginess.
Is there a dairy-free way to make these mini cheesecakes?
Yes, substitute cream cheese with vegan cream cheese and replace sour cream with coconut yogurt. The texture will be slightly different but still tasty.
Pin This Recipe!
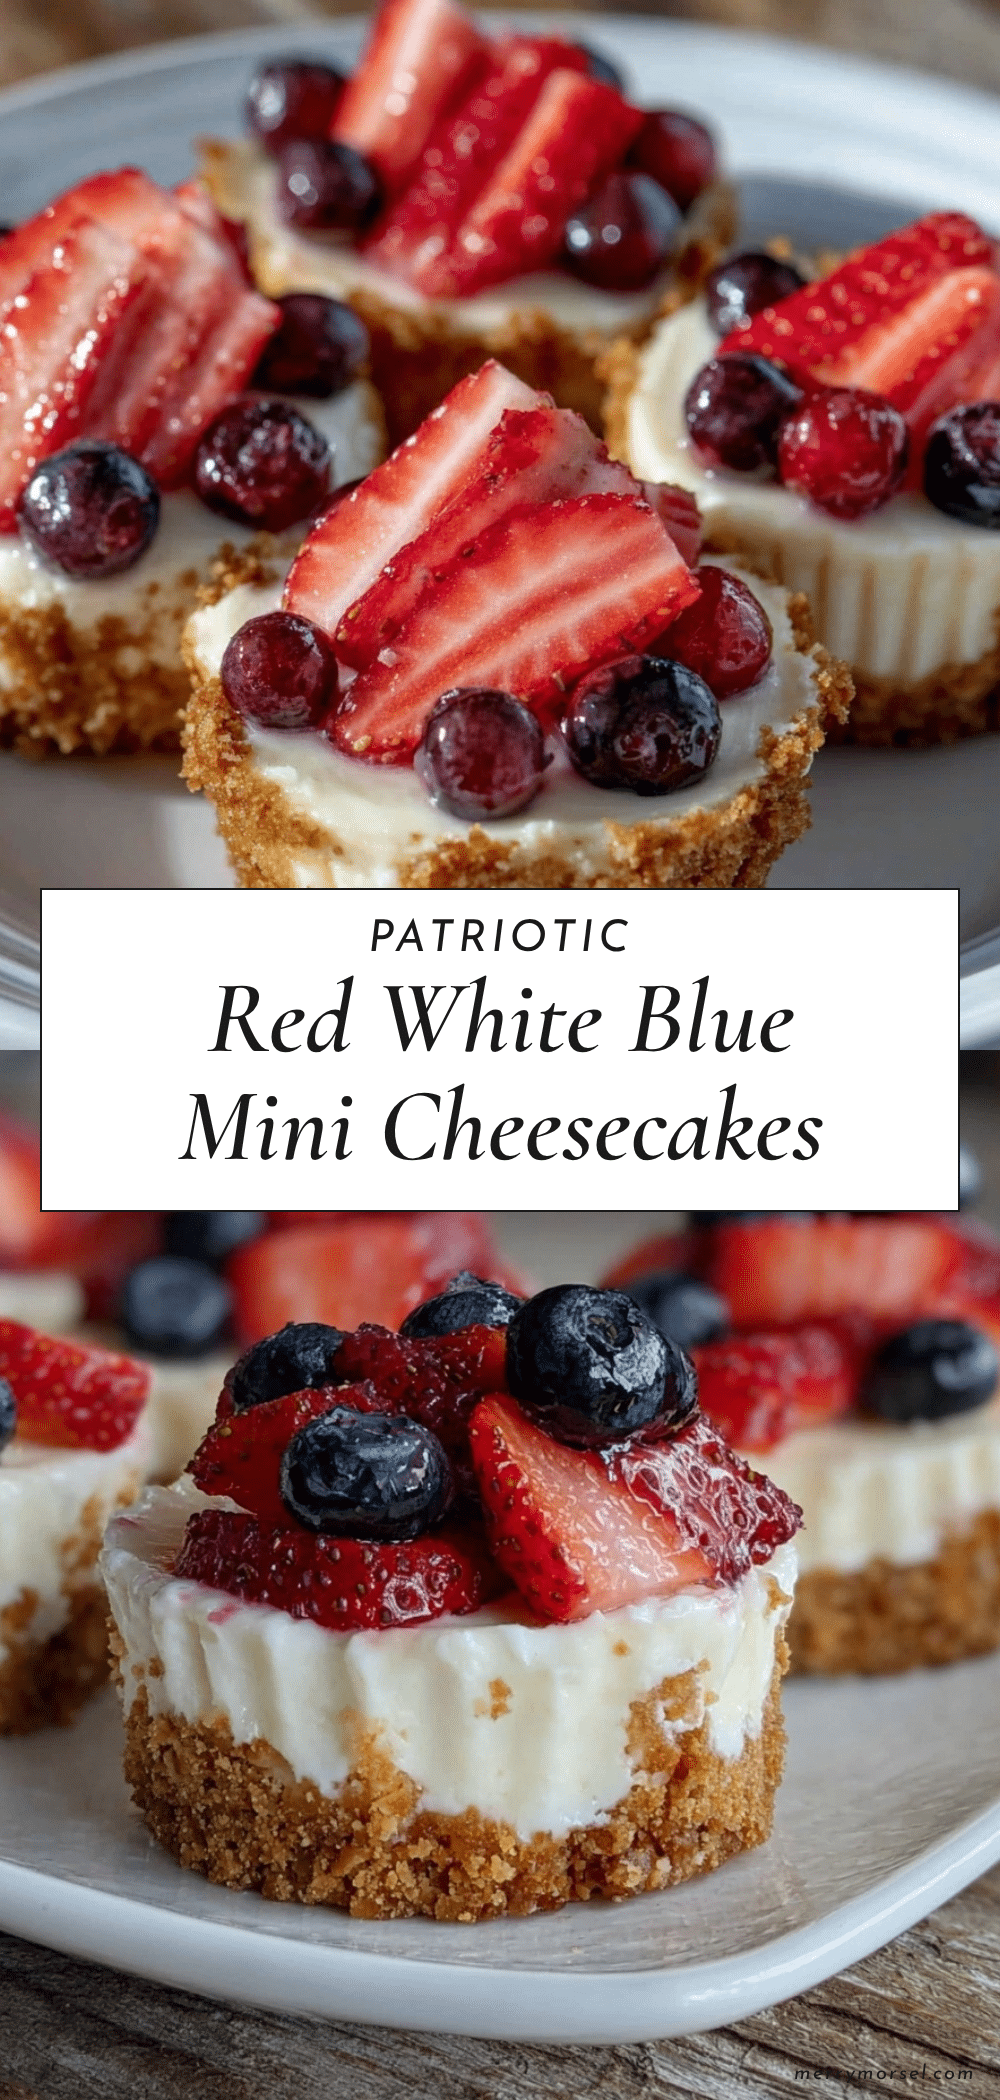
Perfect Red White and Blue Mini Cheesecake Cups

These festive mini cheesecake cups feature layers of red strawberries, white creamy cheesecake, and blue blueberries, perfect for patriotic celebrations. They are quick, easy, and a crowd-pleaser with a crunchy crust and smooth filling.
- Prep Time: 15 minutes
- Cook Time: 29 minutes
- Total Time: 3 hours 44 minutes
- Yield: 12 servings 1x
- Category: Dessert
- Cuisine: American
Ingredients
- 1 ½ cups graham cracker crumbs (about 10 full sheets, finely crushed)
- 5 tablespoons unsalted butter, melted
- 2 tablespoons granulated sugar
- 16 oz (450g) cream cheese, softened to room temperature
- ½ cup (120g) cottage cheese, small-curd
- ¾ cup (150g) granulated sugar
- 2 large eggs, room temperature
- 1 teaspoon pure vanilla extract
- ¼ cup (60ml) sour cream
- 1 cup fresh strawberries, hulled and roughly chopped
- 1 cup fresh blueberries
- Optional: whipped cream for garnish
Instructions
- Preheat your oven to 325°F (163°C). Line your mini muffin tin with cupcake liners or grease lightly.
- In a medium bowl, combine graham cracker crumbs, melted butter, and sugar. Mix until crumbs are evenly moistened and hold together when pressed.
- Spoon about 1 tablespoon of the crust mixture into each muffin cup. Press firmly and evenly into the bottom. Bake for 7 minutes, then remove and let cool.
- In a large bowl, beat cream cheese and cottage cheese on medium speed until smooth and creamy, about 2 minutes.
- Add sugar and beat until fully incorporated. Add eggs one at a time, mixing well after each.
- Stir in vanilla extract and sour cream until just combined. Avoid overmixing.
- Spoon a small layer of chopped strawberries onto each crust. Add cheesecake filling to about ¾ full, leaving room for topping.
- Add a few blueberries on top for the red, white, and blue look.
- Bake at 325°F (163°C) for 18–22 minutes until centers jiggle slightly but are not liquid.
- Let cool at room temperature for 30 minutes, then refrigerate for at least 3 hours or overnight.
- Remove liners and garnish with whipped cream or extra fresh berries if desired. Serve chilled.
Notes
Use room temperature ingredients for smooth blending. Avoid overmixing to prevent cracks. Press crust firmly for best results. Rotate pan halfway if oven is uneven. Frozen berries can be used if thawed and drained. Store refrigerated up to 3 days or freeze up to 1 month.
Nutrition
- Serving Size: 1 mini cheesecake cu
- Calories: 220
- Sugar: 14
- Sodium: 180
- Fat: 12
- Saturated Fat: 7
- Carbohydrates: 18
- Fiber: 1
- Protein: 15
Keywords: mini cheesecake, patriotic dessert, red white and blue, Fourth of July, easy cheesecake, berry cheesecake cups