Love this? Save it for later!
Share the inspiration with your friends
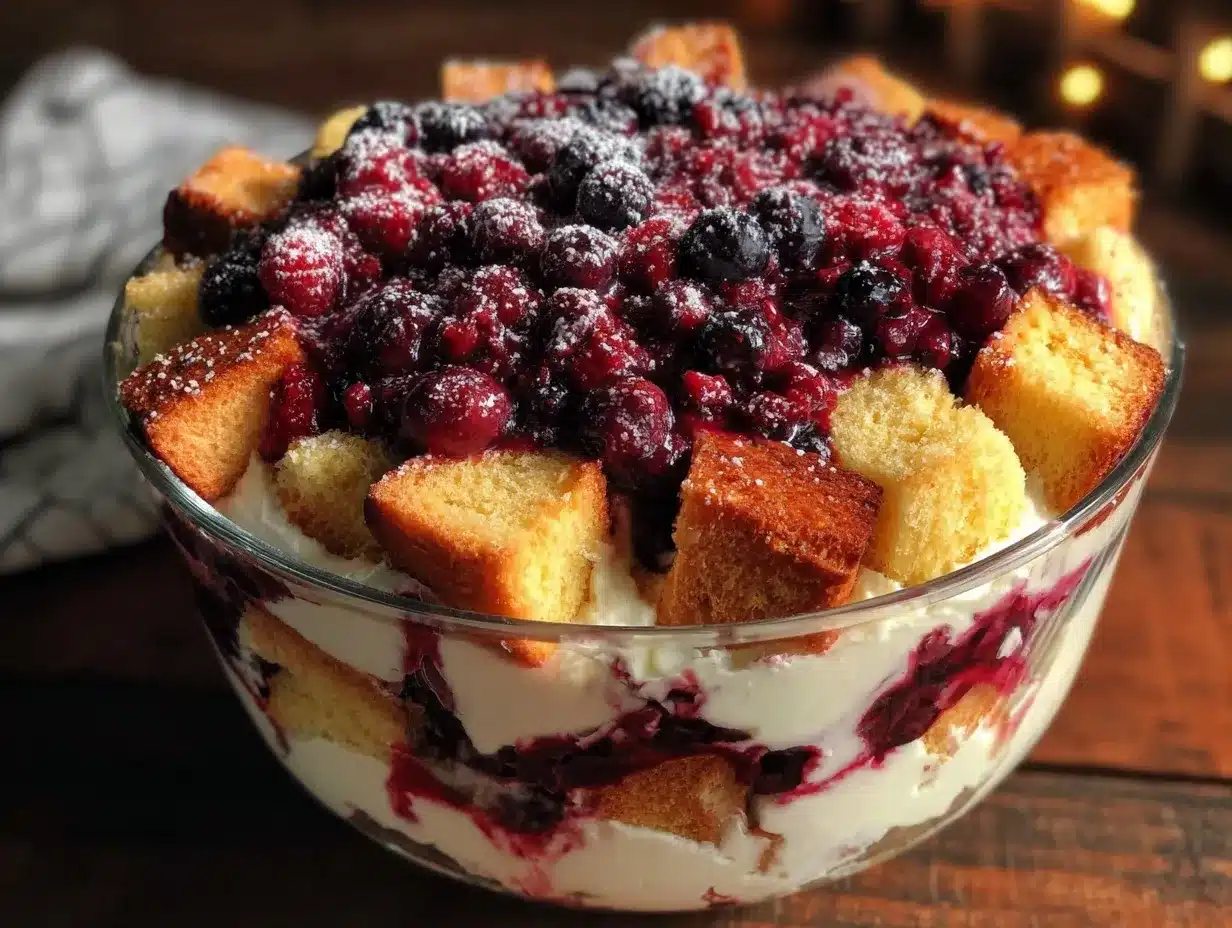
“You sure this will hold up without baking?” my cousin asked, peering suspiciously at the layered dessert I was assembling just hours before our 4th of July barbecue. Honestly, I was half-wondering myself, but there was something about the vibrant reds and blues piled in that tall glass bowl that felt like summer on a plate—fresh, bright, and no-fuss. That year, I was juggling a too-long to-do list, a stubbornly hot kitchen, and well, zero desire to turn on the oven. This easy no-bake berry trifle became my quiet win: a dessert that didn’t demand much but delivered big on smiles.
The layers of fluffy vanilla pudding, juicy berries, and crumbled angel food cake came together so effortlessly that by the time guests arrived, the trifle had already become the centerpiece. The way those sweet, tart berries peeked through the creamy clouds was almost too pretty to eat—almost. I kept finding myself sneaking spoonfuls late at night, the taste reminding me of simpler celebrations with fireworks lighting up the sky and laughter spilling into warm evenings. It’s funny how a simple berry trifle can hold onto those moments, isn’t it?
Since then, this easy no-bake berry trifle has become my go-to for summer get-togethers, especially the 4th of July. It’s the dessert that feels festive without fuss, and every time I make it, I realize it’s the kind of recipe that sticks with you—not because it’s complicated, but because it brings a little bit of joy and ease to the table. That’s why I’m still making it year after year, quietly confident it’ll be the star of the show.
Why You’ll Love This Recipe
There’s a reason this easy no-bake berry trifle is a hit at every 4th of July party I’ve brought it to. After testing and tweaking it over several summers, here’s why it makes life easier and taste buds happier:
- Quick & Easy: Ready in about 20 minutes, it’s perfect for those hectic holiday afternoons when you want something cool and sweet without standing over a hot stove.
- Simple Ingredients: No need for specialty stores—most of these pantry staples and fresh berries are easy to grab at your local market.
- Perfect for Summer Celebrations: Whether it’s a picnic, potluck, or backyard barbecue, this trifle suits the vibe with its refreshing, light texture.
- Crowd-Pleaser: Kids and adults both reach for seconds, thanks to the balance of creamy, fruity, and cakey layers.
- Unbelievably Delicious: The pudding is silky smooth, berries burst with freshness, and angel food cake adds just the right airy crumb.
- Beyond Basic: Instead of a plain pudding, I blend in a touch of vanilla bean paste for that subtle depth, and layering the berries with a splash of lemon zest makes the flavors pop in a way that feels special but totally easy.
This isn’t just another berry trifle you’ve seen around—it’s the kind that makes you pause, spoon halfway to your mouth, and savor that quiet, perfect bite of summer. It’s a dessert that’s as much about the memories as the flavors.
What Ingredients You Will Need
This recipe calls for straightforward, wholesome ingredients that come together beautifully to create that classic trifle charm. Most are pantry staples, with fresh berries bringing the season’s best brightness. Feel free to swap berries depending on what’s ripe and ready at the market or in your fridge.
- Angel Food Cake: About 8 ounces (225 grams), store-bought or homemade, torn into bite-size pieces. Angel food cake gives the trifle its light, airy base without heaviness.
- Mixed Berries: 2 cups (300 grams) fresh strawberries (hulled and sliced), blueberries, and raspberries. Go for ripe, juicy berries for the best flavor.
- Vanilla Pudding: 1 package (3.4 ounces / 96 grams) instant vanilla pudding mix. I trust brands like Jell-O or homemade versions for creaminess.
- Milk: 2 cups (480 ml), whole milk preferred for richness, but 2% works fine too.
- Whipped Cream: 1 cup (240 ml) heavy whipping cream, whipped to soft peaks. You can use store-bought if you’re short on time.
- Lemon Zest: From 1 medium lemon, adds a fresh zing that wakes up the berry flavors.
- Powdered Sugar: 2 tablespoons (15 grams) for sweetening the whipped cream lightly.
- Vanilla Bean Paste or Extract: 1 teaspoon for the pudding or whipped cream to deepen vanilla notes.
If you want a gluten-free option, you can swap the angel food cake for gluten-free pound cake or sponge cake. For a dairy-free version, almond or oat milk can substitute the milk, and coconut whipped cream is a tasty alternative to heavy cream.
Equipment Needed
- Large Mixing Bowl: For whipping cream and mixing pudding.
- Electric Mixer or Whisk: An electric hand mixer makes whipping cream effortless, but a sturdy whisk works if you don’t mind a bit of an arm workout.
- Measuring Cups and Spoons: To get the pudding and sugar quantities just right.
- Large Glass Trifle Bowl or Clear Serving Dish: Presentation matters here—seeing those layers stacked is half the fun.
- Spatula: For folding whipped cream and layering ingredients evenly.
If you don’t have a trifle bowl, a deep glass bowl or even individual mason jars work wonderfully and look charming on the table. For whipping cream without a mixer, chilling your bowl and whisk helps speed things up and get fluffy peaks faster.
Preparation Method
- Prep the Pudding: In a large mixing bowl, whisk together the instant vanilla pudding mix and 2 cups (480 ml) of cold milk. Beat for about 2 minutes until it thickens. Let it sit for 5 minutes to set. Adding a teaspoon of vanilla bean paste here gives a richer vanilla flavor.
- Whip the Cream: While the pudding sets, pour 1 cup (240 ml) of heavy cream into a chilled bowl. Add 2 tablespoons (15 grams) powdered sugar and a splash of vanilla extract. Beat on medium-high speed until soft peaks form—this should take around 3-4 minutes. Be careful not to overwhip, or you’ll end up with butter!
- Fold Whipped Cream into Pudding: Gently fold about half of the whipped cream into the pudding until combined and smooth. This lightens the pudding for that fluffy trifle texture.
- Prepare Berries: Rinse berries gently and pat dry. Hull and slice the strawberries. Zest the lemon and sprinkle it over the berries, tossing lightly to combine. This brightens their flavor beautifully.
- Layer the Trifle: In your chosen serving dish, start with a layer of torn angel food cake pieces (about a third of the cake). Next, add a layer of the pudding and whipped cream mixture, smoothing it evenly. Then scatter a generous layer of the lemon-zested mixed berries.
- Repeat: Add another layer of angel food cake, the remaining pudding mixture, and then more berries. Finish with the remaining whipped cream spread on top, garnished with a few whole berries and a sprinkle of lemon zest for a festive touch.
- Chill: Cover the trifle with plastic wrap and refrigerate for at least 2 hours before serving. This allows the flavors to meld and the cake to soak up some of the cream and berry juices, making every spoonful juicy and soft.
Tip: For a little extra flair, drizzle a bit of honey or a splash of berry liqueur over the berries before layering. Just don’t add too much or it can make the trifle soggy.
Cooking Tips & Techniques
This easy no-bake berry trifle feels straightforward, but a few tricks make it shine every time. First, patience is your friend—letting the pudding set fully before folding in the whipped cream avoids a runny mess. I’ve learned the hard way that rushing this step leads to watery layers, and that’s no fun at a party.
When whipping cream, start with cold cream and a chilled bowl. This small step speeds up whipping and gives you fluffier peaks, which is key for light texture. If you’re nervous about overwhipping, stop and check frequently—the cream should hold soft peaks that gently fold into the pudding.
Another tip: don’t skimp on zesting the lemon. That tiny bit of brightness lifts the whole dessert and balances all that creamy sweetness. Trust me, it’s worth the extra minute.
Layering is where you can get creative. I usually build the trifle in three layers—cake, cream, berries—but you can add more layers or even include a layer of crushed graham crackers for extra crunch. Just remember to keep the layers even for the prettiest presentation.
Finally, this dessert is best chilled for a couple of hours, but no longer than overnight. After too long, the cake gets too soggy, and the berries start to lose their fresh pop. If you want to prep ahead, I suggest assembling everything but the berries, then topping with fresh berries right before serving.
Variations & Adaptations
One of the best things about this easy no-bake berry trifle is how flexible it is. Here are a few ways I’ve personalized it to suit tastes and occasions:
- Patriotic Twist: Stick to red, white, and blue berries—strawberries, blueberries, and raspberries—for a perfect 4th of July color theme.
- Dairy-Free Version: Swap the milk with almond or oat milk and use coconut whipped cream instead of heavy cream. The trifle still feels creamy, just with a subtle coconut undertone.
- Chocolate Berry Trifle: Add a layer of chocolate pudding or sprinkle cocoa nibs between layers for a rich contrast. I once combined this with my brown butter chocolate chip blondies for a decadent summer treat.
- Seasonal Swap: If berries aren’t in season, try stone fruits like peaches or nectarines, or even tropical fruits like mango and kiwi for a fresh twist.
- Nutty Crunch: Sprinkle toasted almonds or pistachios on top for an unexpected crunch that contrasts nicely with the creamy layers.
For a personal favorite, I sometimes fold in a little mascarpone cheese with the whipped cream for an extra silky mouthfeel—makes the trifle feel a bit more indulgent without complicating the recipe.
Serving & Storage Suggestions
This berry trifle is best served chilled, straight from the fridge. The cool temperature keeps the cream light and the berries juicy, perfect for hot summer days. I like to serve it in its original trifle bowl so everyone can admire those layers before digging in.
Pair it with light, refreshing beverages like iced tea or a crisp white wine to balance the sweetness. It also goes well after a casual meal like creamy marry me chicken pasta or a fresh summer salad.
For storage, cover tightly with plastic wrap and refrigerate. It keeps well for up to 2 days, but the cake will soften more each day. If you want to keep it longer, prepare the pudding and whipped cream separately and assemble the trifle just before serving.
To re-serve leftovers, give it a gentle stir to combine the layers as they settle, then enjoy chilled. Flavors actually deepen a bit after resting, making it even tastier the next day—if it lasts that long!
Nutritional Information & Benefits
This easy no-bake berry trifle offers a modest indulgence with some nutritional perks. Fresh berries provide antioxidants, vitamin C, and fiber, which are great for digestion and immune support. The pudding and whipped cream add calcium and protein, especially if you choose whole milk and real cream.
Approximate per serving (serves 8): 280 calories, 5g fat, 45g carbohydrates, 4g protein. You can adjust sweetness by choosing sugar-free pudding mixes or lightening the whipped cream.
For those watching gluten intake, substituting gluten-free cake keeps this dessert friendly for many diets. Just watch for dairy if you need a dairy-free adaptation.
Conclusion
This easy no-bake berry trifle has quietly become my go-to for 4th of July celebrations because it’s simple, pretty, and genuinely delicious. It doesn’t require a fancy kitchen or hours of prep—just good ingredients and a little layering love. What I love most is how it brings that festive feeling to the table without stress, allowing everyone to enjoy the day (and dessert!) fully.
Feel free to tweak the berries or add your own twist—this recipe is flexible enough to handle your creativity. I hope it brings you the same kind of effortless joy and sweet memories it’s given me through the years. Let me know how your trifle turns out or what variations you try!
Frequently Asked Questions
Can I make this trifle ahead of time?
Yes, you can assemble it a few hours ahead and refrigerate, but for best texture, add fresh berries right before serving if making more than 4 hours ahead.
What can I substitute for angel food cake?
Pound cake, sponge cake, or gluten-free cake options work well. Just choose something light and airy to keep the texture balanced.
Is there a dairy-free version of this recipe?
Absolutely! Use almond or oat milk for the pudding and coconut whipped cream instead of dairy-based cream.
Can I use frozen berries?
You can, but thaw and drain them well to avoid extra moisture making the trifle soggy.
How long will leftovers keep?
Stored in the fridge, leftovers are best eaten within 2 days for optimal freshness and texture.
Pin This Recipe!
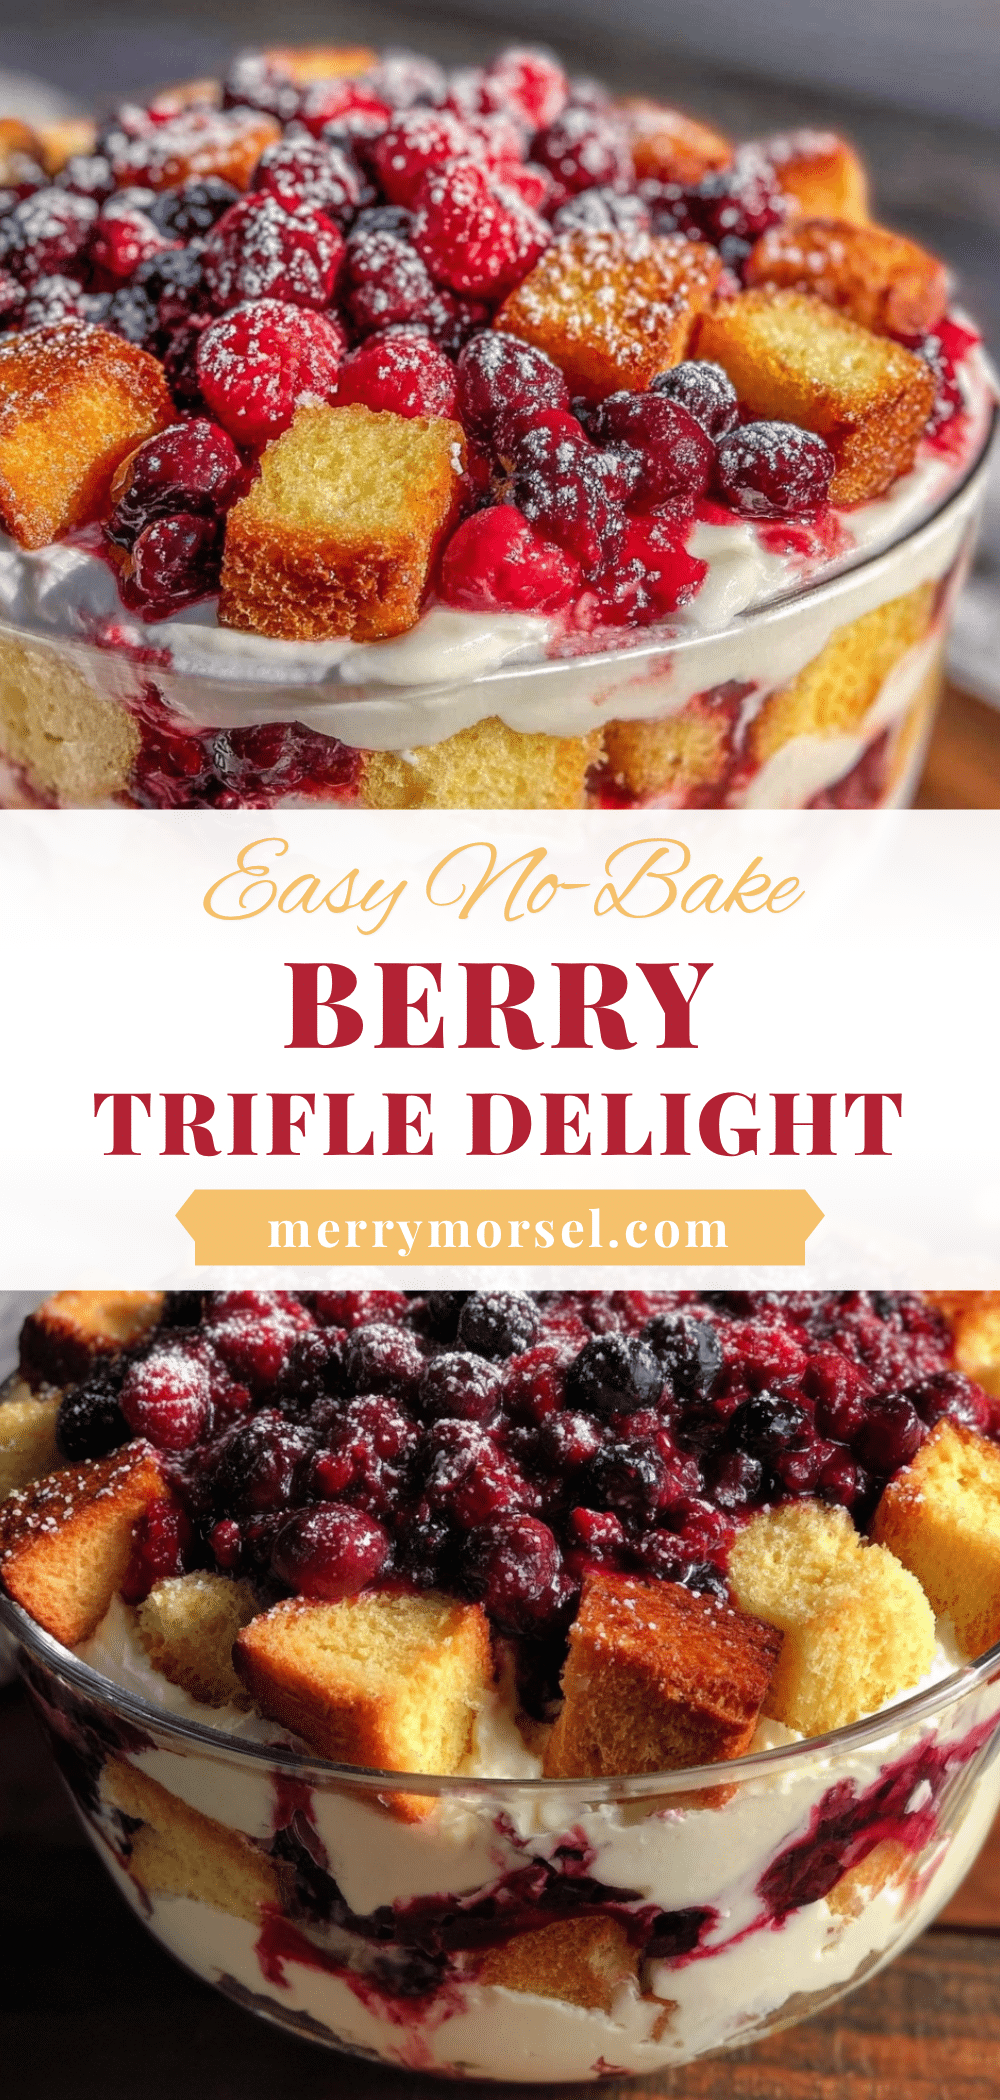
Easy No-Bake Berry Trifle Recipe Perfect for 4th of July Celebrations

A quick and festive no-bake berry trifle featuring layers of vanilla pudding, fresh mixed berries, and angel food cake, perfect for summer celebrations and 4th of July parties.
- Prep Time: 15 minutes
- Cook Time: 0 minutes
- Total Time: 2 hours 15 minutes
- Yield: 8 servings 1x
- Category: Dessert
- Cuisine: American
Ingredients
- 8 ounces angel food cake, torn into bite-size pieces
- 2 cups mixed berries (strawberries hulled and sliced, blueberries, raspberries)
- 1 package (3.4 ounces) instant vanilla pudding mix
- 2 cups whole milk
- 1 cup heavy whipping cream
- 2 tablespoons powdered sugar
- 1 teaspoon vanilla bean paste or extract
- Zest of 1 medium lemon
Instructions
- In a large mixing bowl, whisk together the instant vanilla pudding mix and 2 cups of cold milk. Beat for about 2 minutes until thickened. Let sit for 5 minutes to set. Add 1 teaspoon vanilla bean paste for richer flavor.
- Pour 1 cup heavy cream into a chilled bowl. Add 2 tablespoons powdered sugar and a splash of vanilla extract. Beat on medium-high speed until soft peaks form, about 3-4 minutes. Avoid overwhipping.
- Gently fold half of the whipped cream into the pudding until smooth and combined.
- Rinse berries gently and pat dry. Hull and slice strawberries. Zest the lemon and sprinkle over berries, tossing lightly to combine.
- In a trifle bowl or clear serving dish, layer one-third of the angel food cake pieces, then half of the pudding and whipped cream mixture, followed by a generous layer of lemon-zested mixed berries.
- Repeat layering with remaining angel food cake, pudding mixture, and berries. Finish with the remaining whipped cream spread on top, garnished with whole berries and lemon zest.
- Cover with plastic wrap and refrigerate for at least 2 hours before serving to allow flavors to meld and cake to soak up juices.
Notes
For gluten-free, substitute angel food cake with gluten-free pound or sponge cake. For dairy-free, use almond or oat milk and coconut whipped cream. Chill bowl and whisk before whipping cream for better peaks. Add fresh berries just before serving if assembling more than 4 hours ahead to avoid sogginess. Optional: drizzle honey or berry liqueur over berries before layering for extra flavor.
Nutrition
- Serving Size: 1/8 of the trifle bo
- Calories: 280
- Fat: 5
- Carbohydrates: 45
- Protein: 4
Keywords: no-bake, berry trifle, 4th of July dessert, summer dessert, easy trifle, layered dessert, vanilla pudding, angel food cake