Love this? Save it for later!
Share the inspiration with your friends
The black frosting was everywhere. I mean—on my hands, smudged across my cheek, somehow even on the ceiling fan pull-chain (don’t ask). I was three hours deep into decorating a batch of Halloween sugar cookies, and my five-year-old nephew had just asked if we could make a “whole cat cake” instead. A cookie cake. A big one. With a face. I looked at the pile of perfectly good but time-consuming cut-out cookies, then at the clock, then at the tube of black gel icing I was about to throw across the room. And that’s how this Perfect Black Cat Halloween Cookie Cake was born—out of pure, sticky desperation and a kid’s offhand request.
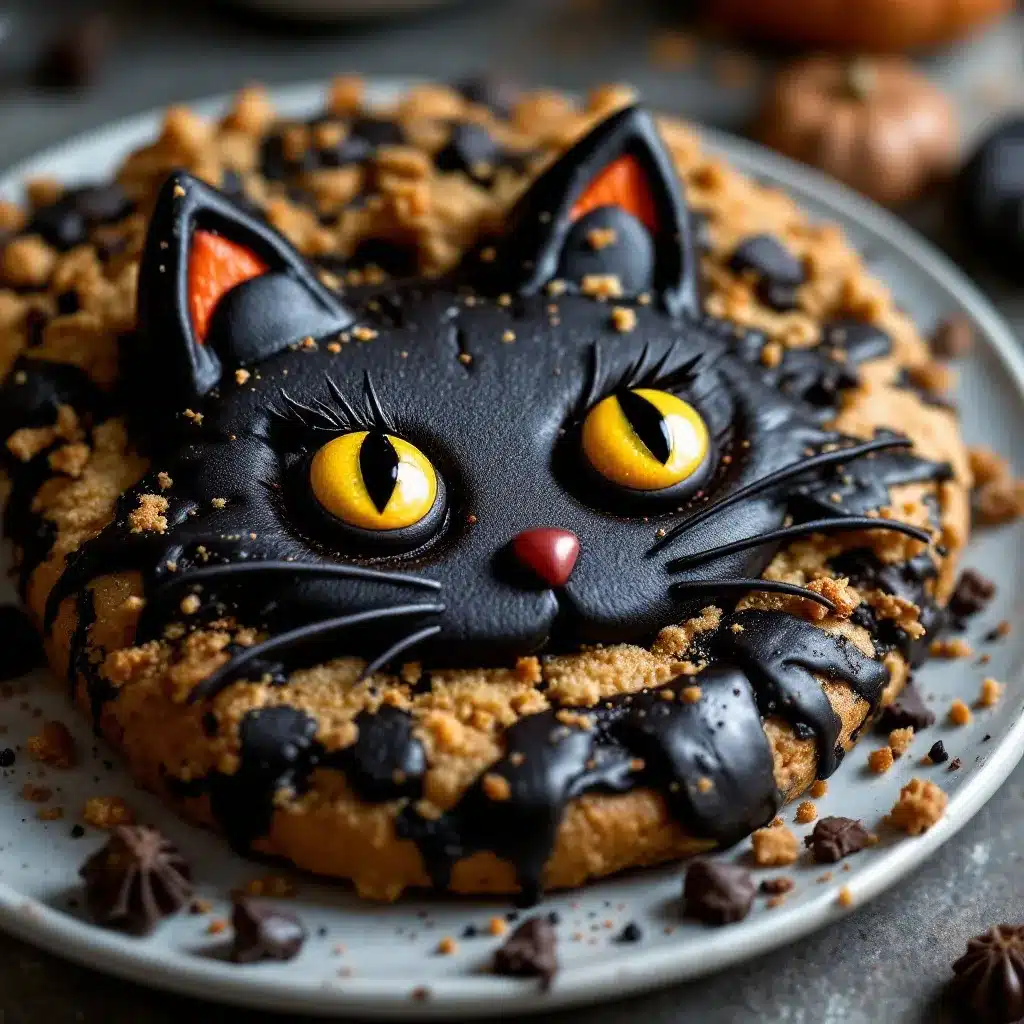
I had a single round cookie cake pan, a batch of my go-to chocolate cookie dough, and a vision of a sleepy black cat peeking out from the center of a spiderweb. No cutters. No piping bags. Just a spoon, some candy eyes, and a lot of hope. It came together in under forty minutes, and honestly? It was the most fun I’ve had baking all spooky season. The cake itself is soft, fudgy, and deeply chocolatey—almost like a giant, chewy brownie in cookie form. The black cat decoration is simple enough for kids to help with, but cute enough to steal the show at any Halloween party.
This recipe stuck because it solved a real problem: how to make something festive without losing your mind. It’s the kind of dessert that looks like you spent hours on it, but really, you just let the dough do the work. And that cat face? It’s got personality. Every time I make it, the cat looks a little different—sometimes grumpy, sometimes mischievous. That’s the beauty of it. You can’t mess it up. So if you’re looking for a Halloween dessert that’s more fun than fuss, this one’s for you.
Why You’ll Love This Recipe
I’ve tested this cookie cake six times now—yes, six—because I wanted to get the texture just right. The first version was too cakey. The second was too thin. But this version? It’s the Goldilocks of Halloween desserts.
- Quick & Easy: From start to finish, you’re looking at about 40 minutes. No chilling the dough, no rolling and cutting. Just press, bake, and decorate.
- Simple Ingredients: Butter, sugar, eggs, flour, cocoa powder—stuff you probably already have in your pantry. No specialty Halloween items required except the candy eyes, which you can find at any grocery store this time of year.
- Perfect for Halloween Parties: This cookie cake is the centerpiece of any spooky spread. It’s large enough to feed a crowd, and the black cat design is universally adored—even by people who “don’t do Halloween.”
- Crowd-Pleaser: Both kids and adults go crazy for it. The fudgy texture appeals to brownie lovers, while the cookie-cake format feels nostalgic and fun.
- Unbelievably Delicious: The chocolate flavor is deep and rich, thanks to a combination of cocoa powder and melted dark chocolate in the dough. It’s not overly sweet, which means you can pile on the frosting without it becoming cloying.
What really sets this recipe apart is the technique. Instead of a standard cookie dough, I use a slightly higher ratio of butter to flour, which gives the cake a tender, almost brownie-like crumb. And the frosting? It’s a simple buttercream dyed jet black with cocoa powder and a touch of black gel coloring—no bitter aftertaste, just smooth, creamy goodness. This isn’t just another Halloween cookie cake. It’s the one that makes people ask for the recipe before they’ve even finished their slice.
There’s something special about pulling this out of the oven. The smell of chocolate fills the kitchen, and the anticipation of decorating it with the kids (or just for yourself, no judgment) is half the fun. It’s the kind of dessert that turns a regular October evening into a mini celebration. And honestly, isn’t that what we all need a little more of?
What Ingredients You Will Need
This recipe uses simple, wholesome ingredients to deliver bold chocolate flavor and a soft, chewy texture. Most of these are pantry staples, which makes this a great last-minute Halloween treat. Let’s break down what you’ll need and why each ingredient matters.
For the Cookie Cake Base
- Unsalted butter, softened (1 cup / 2 sticks) — Butter is the backbone of this cookie cake. Using unsalted butter lets you control the salt level. Make sure it’s truly softened to room temperature, not melted, for the best texture. I prefer using Kerrygold or Land O’Lakes for consistent results.
- Granulated sugar (1 cup / 200g) — White sugar gives the cookie cake its structure and a slight crispness on the edges. Don’t substitute brown sugar here; it would make the cake too dense and moist.
- Light brown sugar, packed (½ cup / 100g) — This adds moisture and a subtle molasses flavor that deepens the chocolate. Pack it firmly into the measuring cup for accuracy.
- Large eggs (2, room temperature) — Eggs provide structure and richness. Room-temperature eggs incorporate more easily into the butter-sugar mixture, creating a smoother dough. If you forget to take them out early, place them in a bowl of warm water for 5 minutes.
- Vanilla extract (2 teaspoons) — Pure vanilla extract enhances the chocolate flavor. Avoid imitation vanilla if possible; the real stuff makes a noticeable difference.
- All-purpose flour (2 cups / 250g) — Spoon and level your flour for the most accurate measurement. Scooping directly from the bag can pack in too much flour, resulting in a dry cookie cake.
- Unsweetened cocoa powder (¾ cup / 75g) — I recommend using Dutch-process cocoa powder for a darker color and smoother flavor. Ghirardelli or Hershey’s Special Dark work beautifully. If you only have natural cocoa powder, that’s fine too—the cake will just be a bit lighter in color.
- Baking soda (1 teaspoon) — This helps the cookie cake spread and rise slightly. Make sure it’s fresh (not expired) for the best results.
- Salt (½ teaspoon) — Salt balances the sweetness and enhances the chocolate notes. I use fine sea salt for baking.
- Dark chocolate chips or chopped dark chocolate (1 cup / 175g) — This is my secret ingredient. Melting a portion of the chocolate into the butter adds richness and a fudgy texture that cocoa powder alone can’t achieve. I like using 60% cacao chocolate for a balanced flavor. Reserve a handful to press into the top of the dough before baking for melty pockets of chocolate.
For the Black Cat Decoration
- Unsalted butter, softened (½ cup / 1 stick) — For the frosting base. Same brand preference as above.
- Powdered sugar (2 cups / 240g) — Sift it before measuring to avoid lumps in your frosting.
- Unsweetened cocoa powder (¼ cup / 25g) — Adds color and flavor to the frosting. This helps you use less black food coloring, which can taste bitter if overdone.
- Heavy cream or milk (2-3 tablespoons) — For thinning the frosting to the perfect piping consistency. Start with 2 tablespoons and add more if needed.
- Black gel food coloring (1-2 teaspoons) — Gel coloring is much more concentrated than liquid, so you’ll get a true black without altering the frosting’s texture. I recommend Americolor Super Black or Chefmaster.
- Candy eyes (2, large) — These are the cat’s eyes. You can find them at craft stores or online. If you don’t have candy eyes, you can pipe white frosting circles and add a small black dot in the center.
- Orange or green M&M’s (optional, for the cat’s collar or eyes) — A fun way to add a pop of color. I’ve also used candy corn for the collar, which looks adorable.
Substitution Guidance
If you need to make this gluten-free, swap the all-purpose flour with a 1:1 gluten-free baking blend that contains xanthan gum. I’ve tested this with King Arthur’s Measure for Measure blend, and it worked perfectly. For a dairy-free version, use vegan butter sticks (like Miyoko’s) and a dairy-free dark chocolate. The texture will be slightly less tender, but still delicious. And if you’re out of dark chocolate for the dough, you can increase the cocoa powder to 1 cup and add an extra tablespoon of butter—just know the cake will be a bit less fudgy.
Equipment Needed
You don’t need a lot of fancy tools for this recipe, which is part of its charm. Here’s what you’ll need:
- 9-inch round cake pan or springform pan — A standard cake pan works great. If you use a springform pan, the cookie cake will be easier to remove. I’ve also made this in a 10-inch cast iron skillet, which gives the edges a lovely crispness. Just reduce the baking time by 2-3 minutes.
- Parchment paper — Cut a circle to line the bottom of the pan. This ensures the cookie cake releases cleanly. Trust me, you don’t want to scrape it out of the pan.
- Electric hand mixer or stand mixer — You can cream the butter and sugar by hand with a wooden spoon, but an electric mixer makes it much easier and gives you a lighter texture. I’ve done it both ways; the mixer is worth the minimal cleanup.
- Mixing bowls — You’ll need a large bowl for the dough and a medium bowl for the frosting.
- Spatula — A rubber spatula is essential for scraping down the sides of the bowl and pressing the dough into the pan evenly.
- Piping bag or zip-top bag — For the frosting. A piping bag with a small round tip gives you more control, but a zip-top bag with the corner snipped off works just as well. I’ve used both, and honestly, the zip-top bag is less intimidating for beginners.
- Cooling rack — Letting the cookie cake cool completely before frosting is crucial. A cooling rack allows air to circulate underneath, preventing a soggy bottom.
If you don’t have a 9-inch round pan, you can use an 8-inch square pan instead. Just note that the baking time will increase by about 3-5 minutes, and the cookie cake will be slightly thicker. I’ve done this when my round pan was in use, and it worked out fine—just adjust your expectations for the shape.
Preparation Method
Let’s get baking! This recipe comes together in about 40 minutes total, including decoration time. Here’s how to do it.
- Preheat and prep the pan. Preheat your oven to 350°F (175°C). Cut a circle of parchment paper to fit the bottom of your 9-inch round cake pan. Lightly grease the sides of the pan with butter or non-stick spray. This step is non-negotiable—the cookie cake will stick without it.
- Melt the chocolate. In a small microwave-safe bowl, combine ½ cup of the dark chocolate chips with 2 tablespoons of the butter. Microwave in 20-second intervals, stirring between each, until smooth. Set aside to cool slightly. This melted chocolate mixture is what gives the cookie cake its fudgy, almost brownie-like texture.
- Cream the butter and sugars. In a large mixing bowl, beat the remaining softened butter (1 cup minus 2 tablespoons) with the granulated sugar and brown sugar until light and fluffy, about 3-4 minutes with an electric mixer on medium speed. Scrape down the sides of the bowl halfway through. The mixture should look pale and slightly aerated.
- Add the eggs and vanilla. Beat in the eggs one at a time, mixing well after each addition. Add the vanilla extract and beat until combined. The mixture might look slightly curdled at this point—that’s normal, especially if your eggs were cold. Don’t panic.
- Add the melted chocolate. Pour the cooled melted chocolate mixture into the bowl and beat on low speed until just combined. Scrape down the sides and bottom of the bowl to make sure everything is incorporated.
- Mix the dry ingredients. In a separate medium bowl, whisk together the flour, cocoa powder, baking soda, and salt. This ensures the leavening agent is evenly distributed. If you skip this step, you might end up with a pocket of baking soda in one bite—trust me, it’s not pleasant.
- Combine wet and dry. Gradually add the dry ingredients to the wet mixture, mixing on low speed until just combined. Do not overmix. Overmixing develops gluten, which will make the cookie cake tough instead of tender. Stop as soon as you no longer see streaks of flour.
- Fold in the remaining chocolate. Using a rubber spatula, fold in the remaining ½ cup of dark chocolate chips. The dough will be thick and slightly sticky—that’s exactly what you want.
- Press into the pan. Transfer the dough to the prepared pan. Using your hands or the back of a spoon, press it into an even layer. The dough should reach the edges of the pan. If it’s sticking to your fingers, lightly dampen your hands with water.
- Bake. Place the pan on the middle rack of your preheated oven. Bake for 18-22 minutes, or until the edges are set and the center looks slightly underdone (it will continue to set as it cools). A toothpick inserted into the center should come out with a few moist crumbs, not wet batter. For a fudgier texture, aim for 18 minutes. For a cakier texture, go to 22 minutes. I prefer 19 minutes for the perfect balance.
- Cool completely. Let the cookie cake cool in the pan for 10 minutes, then transfer it to a cooling rack to cool completely. Do not attempt to frost it while it’s warm, or the frosting will melt into a sad puddle. Patience is key here—I’ve learned this the hard way.
- Make the frosting. While the cookie cake cools, make the frosting. In a medium bowl, beat the softened butter until smooth and creamy. Gradually add the sifted powdered sugar and cocoa powder, beating on low speed until combined. Add the heavy cream and vanilla extract, then beat on medium-high speed for 2 minutes until light and fluffy. Add the black gel food coloring, starting with 1 teaspoon, and beat until the color is uniform. Add more coloring if needed to achieve a deep black. The frosting should be stiff enough to hold its shape but soft enough to pipe.
- Decorate the cat. Once the cookie cake is completely cool, spread a thin layer of black frosting over the entire top surface. This is your base. Then, using a piping bag or zip-top bag with a small round tip, pipe two triangles for the ears at the top of the cake. Pipe two large circles for the eyes, then press the candy eyes into the frosting. Pipe a small pink or white triangle for the nose, and a curved line for the mouth. Add whiskers using thin lines of frosting. If you’re adding a collar, pipe a thin band of frosting across the “neck” area and press orange M&M’s into it. Let your creativity run wild—every cat should have its own personality.
- Set and serve. Refrigerate the decorated cookie cake for 15-20 minutes to let the frosting firm up. This makes slicing cleaner. Slice into wedges and serve at room temperature.
Cooking Tips & Techniques
I’ve made this cookie cake enough times to know where things can go wrong. Here are my hard-earned tips for getting it perfect every time.
Don’t overbake. This is the number one mistake. The cookie cake will look underdone in the center when you pull it out, but it continues to bake on the hot pan. Overbaking gives you a dry, crumbly cake instead of a fudgy, chewy one. I once left it in for 24 minutes because I got distracted by a phone call, and it was sad—like eating a chocolate hockey puck. Learn from my failure.
Use room temperature ingredients. Cold eggs and butter don’t cream together properly, which affects the texture. If you’re in a rush, you can warm the eggs by placing them in a bowl of warm water for 5 minutes, and microwave the butter for 5-10 seconds (just don’t melt it).
Chill the frosting if it gets too soft. If you’re decorating in a warm kitchen, the frosting might become too soft to pipe clean lines. Pop the bowl in the fridge for 10 minutes, then give it a quick stir before continuing. This saved me during a particularly hot October afternoon.
Let the cookie cake cool completely. I cannot stress this enough. Frosting a warm cookie cake is a recipe for disaster. The frosting will slide off, melt, and look like a crime scene. I speak from experience—my first attempt looked like a sad, melted cat.
Use a light hand with the food coloring. Black gel coloring is potent. Start with 1 teaspoon and add more gradually. You can always add more, but you can’t take it out. Too much can also make the frosting taste slightly bitter, so go slow.
For cleaner slices, use a sharp knife. Dip the knife in hot water, wipe it dry, then slice. Repeat between each cut. This gives you those beautiful, Instagram-worthy slices with clean edges.
Variations & Adaptations
This recipe is endlessly adaptable. Here are some of my favorite variations.
Gluten-Free Version: Substitute the all-purpose flour with a 1:1 gluten-free baking blend. I’ve tested this with King Arthur’s Measure for Measure, and it works perfectly. The texture is slightly more tender, but the chocolate flavor shines through. Just make sure your blend contains xanthan gum for structure.
Vegan Version: Use vegan butter sticks (like Miyoko’s or Earth Balance) and replace the eggs with flax eggs (2 tablespoons ground flaxseed mixed with 6 tablespoons water, let sit for 5 minutes). Use dairy-free dark chocolate and a vegan heavy cream alternative. The texture will be a bit denser, but it’s still delicious. I made this for a vegan friend’s Halloween party, and no one guessed it was vegan.
White Chocolate Cat: Instead of dark chocolate, use white chocolate chips in the dough and add a teaspoon of vanilla bean paste. Decorate the cat with white frosting and use pink candy eyes. It gives the cake a completely different vibe—like a ghost cat!
Pumpkin Spice Cat: Add 1 teaspoon of pumpkin pie spice to the dry ingredients and substitute ¼ cup of the butter with pumpkin puree. The cake will be slightly more moist and have a warm, fall flavor. This pairs beautifully with the chocolate. I tried this last year, and it was a hit at our Friendsgiving.
Mini Cat Cookie Cakes: Use a 6-inch round pan or even a jumbo muffin tin to make individual cookie cakes. Reduce the baking time to 12-15 minutes. These are perfect for party favors or school Halloween parties. Each one gets its own little cat face!
Peanut Butter Cat: Swirl ½ cup of creamy peanut butter into the dough before baking. The combination of chocolate and peanut butter is a classic for a reason. Top with a few peanut butter chips for extra crunch.
Serving & Storage Suggestions
This cookie cake is best served at room temperature, which allows the frosting to soften slightly and the cake to reach its full fudgy potential. I like to slice it into wedges and arrange them on a platter with a few extra candy eyes scattered around for a spooky touch.
For a complete Halloween dessert spread, pair this with a glass of cold milk, a scoop of vanilla ice cream, or a warm cup of pumpkin spice cold foam coffee. The rich chocolate flavor balances beautifully with the creamy, spiced notes of the coffee. If you’re hosting a party, serve it alongside witch finger cookie sticks for a truly memorable dessert table.
Storage: Store the cookie cake in an airtight container at room temperature for up to 3 days. If your kitchen is warm, refrigerate it to prevent the frosting from softening too much. Bring it back to room temperature before serving for the best texture.
Freezing: You can freeze the undecorated cookie cake for up to 3 months. Wrap it tightly in plastic wrap, then in aluminum foil. When you’re ready to serve, thaw it in the refrigerator overnight, then bring it to room temperature before frosting and decorating. I’ve done this for pre-Halloween prep, and it works like a charm.
Reheating: If you want that just-baked warmness, microwave a slice for 10-15 seconds. The frosting will get a little melty, but that’s part of the charm. Just don’t overdo it, or you’ll end up with a puddle of chocolate soup.
The flavors actually deepen after a day or two, so this is a great make-ahead dessert. The chocolate becomes more pronounced, and the texture stays wonderfully fudgy. It’s one of those rare recipes that tastes even better the next day.
Nutritional Information & Benefits
Let’s be real—this is a treat, not a health food. But that doesn’t mean it can’t have some redeeming qualities. Here’s the estimated nutritional breakdown per slice (assuming 12 servings):
- Calories: 410
- Fat: 22g
- Carbohydrates: 52g
- Protein: 5g
- Fiber: 3g
- Sugar: 35g
The dark chocolate in this recipe is a source of antioxidants, particularly flavonoids, which can support heart health. Cocoa powder is also rich in iron and magnesium. The butter and eggs provide fat-soluble vitamins A, D, E, and K. And the fiber content, while modest, comes from the cocoa and flour.
If you’re looking to lighten it up, you can reduce the sugar by ¼ cup without significantly affecting the texture, or use a sugar substitute like monk fruit sweetener. The frosting can be made with cream cheese instead of butter for a tangier, lower-fat option. But honestly? Halloween is one night a year. I say go all in, enjoy every bite, and don’t worry about the numbers.
This recipe is vegetarian and can be made vegan with the substitutions mentioned above. It contains gluten, dairy, and eggs in its standard form. If you have allergies, please check the labels on your chocolate and food coloring, as some brands may contain traces of nuts or soy.
Conclusion
This Perfect Black Cat Halloween Cookie Cake is the kind of recipe that makes you feel like a baking superstar without the stress. It’s fudgy, chocolatey, and ridiculously fun to decorate. Whether you’re making it for a Halloween party, a classroom celebration, or just a cozy night in with the family, it delivers every time.
I love this recipe because it’s forgiving. You don’t need to be a pastry chef to make it look good. The cat face can be as simple or as detailed as you want, and it always turns out cute. It’s the kind of dessert that brings people together—kids gather around to help with the candy eyes, adults sneak slices before dinner, and everyone leaves with a smile.
So go ahead, give it a try. Customize it with your favorite decorations, make it your own, and don’t forget to share a photo. I’d love to see your black cat creations—they always make my day. Drop a comment below and let me know how yours turned out. And if you’re looking for more Halloween baking ideas, check out my black cat sugar cookies for a fun, no-fuss alternative. Happy Halloween, and happy baking!
Frequently Asked Questions
Can I make this cookie cake ahead of time?
Absolutely! You can bake the cookie cake up to 2 days in advance and store it, unfrosted, in an airtight container at room temperature. Frost and decorate it on the day you plan to serve it for the freshest look. If you need to make it even further ahead, freeze the undecorated cake for up to 3 months.
My frosting turned out gray instead of black. What went wrong?
This usually happens when you don’t use enough food coloring or when the frosting base is too yellow. Start with a base that already has cocoa powder mixed in (as this recipe does), which gives you a dark brown starting point. Then add black gel coloring gradually until you reach the desired shade. If it still looks gray, add a tiny drop of purple gel coloring—it neutralizes the yellow tones and helps achieve a true black.
Can I use a different type of chocolate?
Yes, you can use milk chocolate or semi-sweet chocolate instead of dark chocolate. Just note that milk chocolate will make the cookie cake sweeter and slightly less fudgy. If you use white chocolate, the cake will have a completely different flavor profile—more like a vanilla cookie with white chocolate chips.
How do I prevent the cookie cake from sticking to the pan?
Line the bottom of the pan with parchment paper and grease the sides thoroughly with butter or non-stick spray. Let the cake cool in the pan for 10 minutes before transferring it to a cooling rack. If it still sticks, run a thin knife around the edge of the pan to loosen it before inverting.
Can I double this recipe for a larger crowd?
Yes, you can double the ingredients and bake the cookie cake in a 12-inch round pan or a 9×13-inch sheet pan. Increase the baking time by 5-8 minutes, and check for doneness by inserting a toothpick into the center. For a sheet pan, you can decorate multiple smaller cat faces instead of one large one—perfect for a party!
Pin This Recipe!

Perfect Black Cat Halloween Cookie Cake – Easy Spooky Dessert

A fudgy, chocolatey cookie cake decorated as a black cat, perfect for Halloween parties. Quick to make with simple ingredients and no special equipment required.
- Prep Time: 20 minutes
- Cook Time: 20 minutes
- Total Time: 40 minutes
- Yield: 12 servings 1x
- Category: Dessert
- Cuisine: American
Ingredients
- 1 cup (2 sticks) unsalted butter, softened
- 1 cup (200g) granulated sugar
- ½ cup (100g) light brown sugar, packed
- 2 large eggs, room temperature
- 2 teaspoons vanilla extract
- 2 cups (250g) all-purpose flour
- ¾ cup (75g) unsweetened cocoa powder (Dutch-process preferred)
- 1 teaspoon baking soda
- ½ teaspoon salt
- 1 cup (175g) dark chocolate chips or chopped dark chocolate (60% cacao), divided
- ½ cup (1 stick) unsalted butter, softened (for frosting)
- 2 cups (240g) powdered sugar, sifted
- ¼ cup (25g) unsweetened cocoa powder (for frosting)
- 2–3 tablespoons heavy cream or milk
- 1–2 teaspoons black gel food coloring
- 2 large candy eyes
- Orange or green M&M’s (optional, for collar)
Instructions
- Preheat oven to 350°F (175°C). Line bottom of a 9-inch round cake pan with parchment paper and grease sides.
- In a small microwave-safe bowl, combine ½ cup dark chocolate chips with 2 tablespoons butter. Microwave in 20-second intervals, stirring until smooth. Set aside to cool slightly.
- In a large bowl, beat remaining softened butter (1 cup minus 2 tablespoons) with granulated sugar and brown sugar until light and fluffy, about 3-4 minutes.
- Beat in eggs one at a time, then add vanilla extract.
- Add cooled melted chocolate mixture and beat on low until just combined.
- In a separate bowl, whisk together flour, cocoa powder, baking soda, and salt.
- Gradually add dry ingredients to wet mixture, mixing on low until just combined. Do not overmix.
- Fold in remaining ½ cup dark chocolate chips.
- Press dough evenly into prepared pan.
- Bake for 18-22 minutes, until edges are set and center looks slightly underdone. Cool in pan 10 minutes, then transfer to wire rack to cool completely.
- For frosting: Beat ½ cup softened butter until smooth. Gradually add sifted powdered sugar and cocoa powder, beating on low. Add heavy cream and vanilla, then beat on medium-high for 2 minutes. Add black gel food coloring until desired shade is reached.
- Once cookie cake is cool, spread a thin layer of black frosting over top. Pipe two triangles for ears, two circles for eyes, and press candy eyes into frosting. Pipe nose, mouth, and whiskers. Add optional collar with M&M’s.
- Refrigerate 15-20 minutes to set frosting. Slice and serve at room temperature.
Notes
Do not overbake; the center should look slightly underdone. Use room temperature ingredients for best texture. Chill frosting if it becomes too soft. For cleaner slices, dip knife in hot water and wipe dry between cuts.
Nutrition
- Serving Size: 1 slice
- Calories: 410
- Sugar: 35
- Sodium: 220
- Fat: 22
- Saturated Fat: 13
- Carbohydrates: 52
- Fiber: 3
- Protein: 5
Keywords: Halloween cookie cake, black cat cookie cake, chocolate cookie cake, easy Halloween dessert, spooky dessert, fudgy cookie cake


