Love this? Save it for later!
Share the inspiration with your friends
The neighborhood Halloween block party was in four hours and I’d completely forgotten. Everyone else would be bringing elaborate themed desserts—I’d seen the neighbor across the street hauling in a three-tiered cake shaped like a haunted house. I had a stick of butter, some sugar, and a vague sense of panic. My kids were counting on me, and honestly, I was counting on the universe to give me a break.
I rummaged through my pantry like a woman possessed. Flour, check. Vanilla, check. Then my eyes landed on a bottle of black food coloring I’d bought on a whim last October and never opened. That’s when it clicked—black cat cookies. They’d be simple, cute, and maybe, just maybe, nobody would notice I’d been scrambling. I grabbed my go-to sugar cookie recipe, the one I’ve made so many times I could do it in my sleep, and got to work.
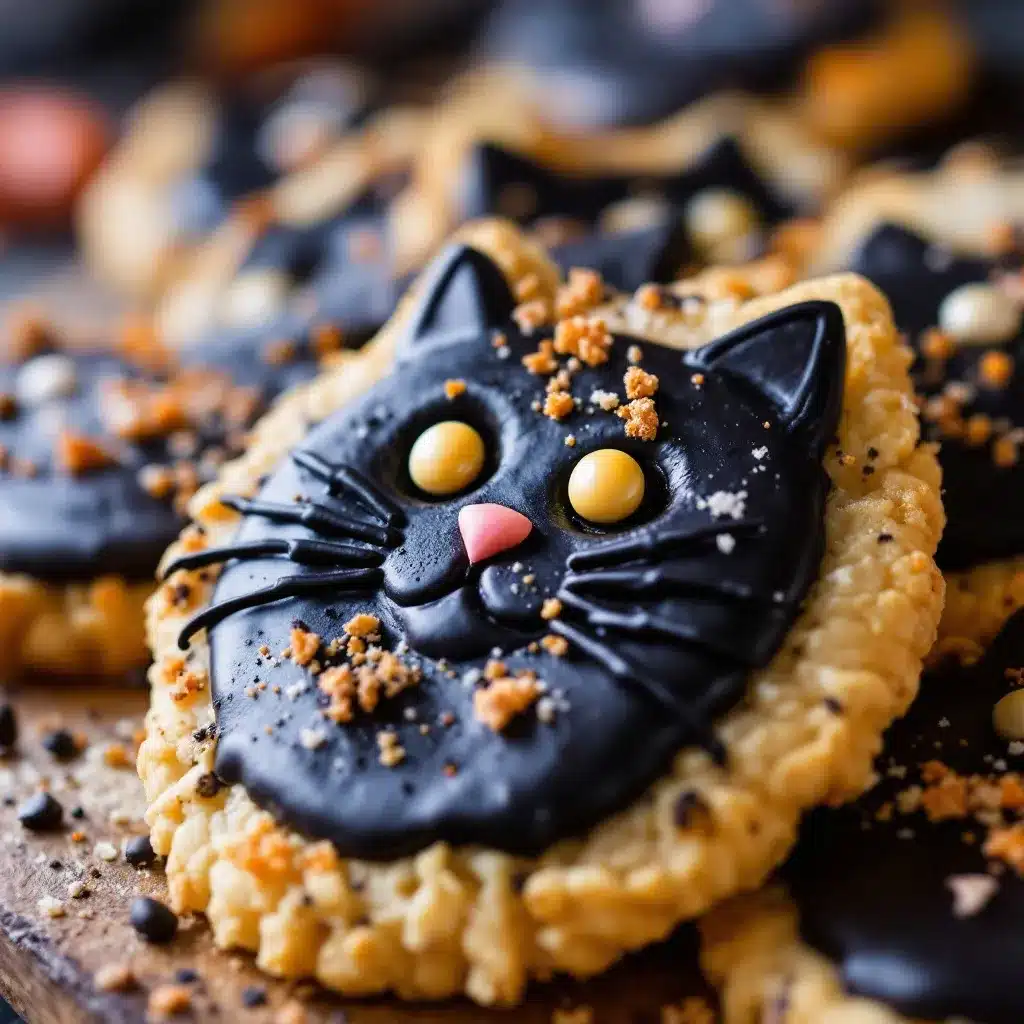
Let me tell you, the first batch looked more like charcoal blobs than cats. My daughter walked in, took one look, and said, “Mom, those are sad potatoes.” Fair enough. But I wasn’t about to show up empty-handed. So I tweaked the shape, chilled the dough longer, and tried again. The second batch came out perfect—little black cats with curved tails and pointed ears. I added some orange frosting eyes and a few whiskers, and suddenly they were adorable. I mean, actually cute enough to make people smile.
I walked into that block party with a platter of black cat cookies, feeling like I’d pulled a rabbit out of a hat. And you know what happened? People went crazy for them. The haunted house cake sat untouched while my little black cats disappeared within the first hour. A few people asked for the recipe, and I just laughed. “It’s nothing special,” I said. But honestly, it kind of was. These black cat Halloween sugar cookies became my signature party trick, and I’ve been making them every year since. Maybe you’ve been there—scrambling at the last minute, hoping for a miracle. Trust me, this recipe delivers.
Why You’ll Love This Recipe
I’ve tested this recipe more times than I care to admit, and let me tell you, it’s foolproof once you know the tricks. These black cat Halloween sugar cookies aren’t just cute—they’re genuinely delicious. The texture is soft in the middle with slightly crisp edges, and the flavor is that classic buttery vanilla that everyone loves.
- Quick & Easy: From start to finish, you’re looking at about 45 minutes including chill time. Perfect for last-minute Halloween cravings or school parties.
- Simple Ingredients: Nothing fancy here. You probably have most of these in your pantry right now, minus the black food coloring.
- Perfect for Halloween: These steal the show at parties, trick-or-treat gatherings, or just a fun baking afternoon with the kids.
- Crowd-Pleaser: I’ve brought these to multiple events and they always vanish first. Kids and adults alike can’t resist them.
- Unbelievably Delicious: The combination of soft sugar cookie and creamy frosting is pure comfort food magic.
What makes this recipe different from the rest? It’s the chilling technique. I learned the hard way that black sugar cookie dough needs extra time in the fridge to hold its shape. Skip this step and you’ll end up with sad potatoes too. The frosting is also key—I use a simple buttercream that firms up nicely without being too sweet.
These cookies aren’t just good—they’re the kind that make you close your eyes after the first bite. They’re Halloween comfort food reimagined: fun, festive, and totally stress-free. Perfect for impressing guests without spending all day in the kitchen, or turning a regular October evening into something memorable.
What Ingredients You Will Need
This recipe uses simple, wholesome ingredients to deliver bold flavor and satisfying texture without the fuss. Most of these are pantry staples, so you can whip up a batch anytime the Halloween spirit strikes.
For the Sugar Cookies
- 2 ¾ cups all-purpose flour (spooned and leveled; I prefer King Arthur for consistent results)
- 1 teaspoon baking powder
- ½ teaspoon salt
- 1 cup unsalted butter, softened (use European-style butter like Plugrà for richer flavor)
- 1 ½ cups granulated sugar
- 1 large egg, room temperature
- 2 teaspoons vanilla extract
- 1-2 tablespoons black gel food coloring (I recommend AmeriColor Super Black—it’s concentrated and won’t alter the texture)
For the Frosting
- ½ cup unsalted butter, softened
- 2 cups powdered sugar, sifted
- 2 tablespoons heavy cream (or whole milk in a pinch)
- ½ teaspoon vanilla extract
- Orange gel food coloring (for the eyes and details)
Ingredient Tips
For the black food coloring, gel is non-negotiable. Liquid coloring will make your dough too wet and the cookies will spread like crazy. I’ve made that mistake once—never again. If you can’t find black gel coloring, you can use cocoa powder to darken the dough naturally, but it won’t be as intense. For a dairy-free version, swap the butter with vegan butter sticks (I like Earth Balance) and use coconut cream instead of heavy cream.
When selecting your vanilla extract, go for pure vanilla if you can. It makes a real difference in the flavor. And for the sugar, regular granulated works perfectly—no need for superfine or caster sugar here.
Equipment Needed
You don’t need a professional bakery setup for these cookies, but a few key tools make the process much smoother.
- Electric mixer (stand or hand-held both work; I use my KitchenAid stand mixer because it frees up my hands)
- Rolling pin (a standard wooden one is fine; I prefer a French tapered pin for better control)
- Black cat cookie cutter (available online or at craft stores; a simple cat silhouette works best)
- Baking sheets (light-colored metal sheets give the most even browning; avoid dark non-stick pans)
- Parchment paper (essential for easy cleanup and preventing sticking)
- Cooling rack (wire rack for even cooling)
- Piping bags (disposable ones are easiest; you’ll need a small round tip for the eyes)
- Spatula (offset spatula makes frosting application cleaner)
If you don’t have a cat-shaped cutter, you can freehand the shape using a knife—just chill the dough extra firm and cut carefully. I’ve done this before when I couldn’t find my cutter, and it worked fine. For the piping bags, a zip-top bag with a tiny corner snipped off works in a pinch.
Preparation Method
- Make the Cookie Dough
In a medium bowl, whisk together 2 ¾ cups all-purpose flour, 1 teaspoon baking powder, and ½ teaspoon salt. Set aside. In a large bowl, beat 1 cup softened unsalted butter and 1 ½ cups granulated sugar together until light and fluffy—about 3 minutes on medium speed. Scrape down the sides of the bowl. Add 1 large egg and 2 teaspoons vanilla extract, then beat until combined. The mixture should look smooth and creamy.
- Add the Color
Gradually add the dry ingredients to the wet mixture, mixing on low speed until just combined. Don’t overmix or your cookies will be tough. Now for the tricky part: add 1 tablespoon of black gel food coloring and mix until the color is even. If the dough looks more dark gray than black, add another tablespoon. The color will deepen slightly as the dough chills, so aim for a shade darker than you think you need.
- Chill the Dough
Divide the dough into two discs, wrap each in plastic wrap, and refrigerate for at least 30 minutes. This step is crucial—I cannot stress this enough. If you skip it, your cats will spread into shapeless blobs. For best results, chill for an hour. You can even make the dough a day ahead and keep it in the fridge.
- Roll and Cut
Preheat your oven to 350°F (175°C). Line two baking sheets with parchment paper. On a lightly floured surface, roll one disc of dough to about ¼-inch thickness. Flour your rolling pin if the dough starts to stick. Use your black cat cutter to cut out shapes, then carefully transfer them to the prepared baking sheets, spacing them about 2 inches apart. Gather the scraps, re-roll, and cut again.
- Bake
Bake for 8-10 minutes, or until the edges are just set. The cookies won’t look golden because they’re black, so watch for the edges to look slightly dry. Remove from the oven and let them cool on the baking sheet for 5 minutes, then transfer to a wire rack to cool completely. They’ll firm up as they cool.
- Make the Frosting
While the cookies cool, make the frosting. Beat ½ cup softened unsalted butter until creamy. Gradually add 2 cups sifted powdered sugar, beating on low speed until combined. Add 2 tablespoons heavy cream and ½ teaspoon vanilla extract, then beat on medium-high for 2 minutes until light and fluffy. Set aside about ¼ cup of the frosting and tint it orange with gel food coloring.
- Decorate
Once the cookies are completely cool, use the white frosting to pipe two small eyes on each cat. Then use the orange frosting to add a tiny dot in the center of each eye—this gives them that cute, alive look. For the whiskers, use a toothpick dipped in white frosting to draw three thin lines on each side of the face. Let the frosting set for about 15 minutes before serving.
Cooking Tips & Techniques
I’ve made these black cat Halloween sugar cookies more times than I can count, and I’ve learned a few things the hard way. Let me save you some trouble.
Don’t overwork the dough. When you’re mixing in the food coloring, it’s tempting to keep beating until the color is perfectly even. But overmixing develops gluten, which makes cookies tough. Instead, fold the color in by hand with a spatula once the dough comes together. The color will distribute more evenly as you roll it out.
Chill between batches. If you’re making multiple batches, pop the cut-out cookies back in the fridge for 10 minutes before baking. This helps them hold their shape. I once tried to rush through and baked a second batch right after the first without re-chilling. They spread into amorphous blobs. Lesson learned.
Watch the baking time carefully. Since black cookies don’t show browning, it’s easy to overbake them. Set a timer for 8 minutes and check. They should look set around the edges but still soft in the center. They’ll continue cooking on the hot baking sheet after you pull them out.
Use a light touch with the frosting. Less is more here. You want the cat shape to be visible, not buried under a mountain of icing. A small piping tip (like a #2 or #3) gives you better control for the eyes and details.
Variations & Adaptations
One of the best things about this recipe is how easily it adapts. Here are a few variations I’ve tried and loved.
Gluten-Free Version: Swap the all-purpose flour with a 1:1 gluten-free baking flour blend. I’ve used Bob’s Red Mill with great results. Add an extra tablespoon of milk to the dough since gluten-free flour absorbs more liquid. The texture will be slightly more tender, but they’re still delicious.
Vegan Adaptation: Use vegan butter sticks (not margarine) and a flax egg (1 tablespoon ground flaxseed mixed with 3 tablespoons water, let sit for 5 minutes). For the frosting, use vegan butter and coconut cream. The cookies won’t be quite as tender, but they’re still a hit with vegan friends.
Spiced Version: Add 1 teaspoon of cinnamon and ½ teaspoon of nutmeg to the dry ingredients. This gives the cookies a warm, fall flavor that pairs beautifully with the black cat theme. I made these for a Halloween brunch and they disappeared faster than the plain ones.
Different Shapes: Don’t limit yourself to cats. Use this black sugar cookie dough for bats, ghosts, or pumpkins. The black color works surprisingly well for silhouettes. Just adjust your baking time slightly for smaller or larger shapes.
Serving & Storage Suggestions
These cookies are best served at room temperature. Arrange them on a platter with some orange and purple napkins for a festive look. I like to place them on a black cake stand so the orange eyes really pop.
For drinks, these pair beautifully with a warm mug of apple cider or a glass of cold milk. If you’re serving adults, a hot caramel latte or even a pumpkin spice coffee complements the buttery vanilla flavor perfectly.
Storage: Store the cookies in an airtight container at room temperature for up to 5 days. Layer them between sheets of parchment paper to prevent the frosting from smudging. Do not refrigerate—the fridge will make them dry and the frosting can get sticky.
Freezing: You can freeze the baked, undecorated cookies for up to 3 months. Wrap them tightly in plastic wrap and then foil. When you’re ready to serve, thaw at room temperature, then decorate. Alternatively, freeze the raw cookie dough discs for up to 3 months. Thaw in the fridge overnight, then roll, cut, and bake as directed.
The flavors actually develop a bit after a day or two—the cookies become slightly softer and the vanilla flavor mellows out. So don’t stress about making them the day before. In fact, I prefer them on day two.
Nutritional Information & Benefits
Per cookie (based on 24 cookies): approximately 180 calories, 9g fat, 24g carbohydrates, 2g protein, 12g sugar. These numbers are estimates and will vary based on your specific ingredients and how much frosting you use.
While these are definitely a treat, there are a few redeeming qualities. The butter provides vitamin A and healthy fats, and the vanilla extract has trace amounts of antioxidants. Plus, there’s something to be said for the mental health benefits of baking—it’s meditative, creative, and the joy of sharing these cookies with others is priceless.
For those with dietary concerns, this recipe contains gluten, dairy, and eggs. The gluten-free and vegan variations listed above work well for most dietary restrictions. If you’re watching your sugar intake, you can reduce the sugar in the cookie dough to 1 cup without significantly affecting the texture.
Conclusion
These black cat Halloween sugar cookies have become my go-to for every October gathering. They’re proof that you don’t need complicated techniques or fancy ingredients to create something memorable. Whether you’re scrambling for a last-minute party contribution, baking with your kids on a rainy afternoon, or just want to bring a smile to someone’s face, these cookies deliver every time.
I encourage you to make them your own. Add extra orange details, pipe on little bows, or experiment with different frosting colors. The beauty of this recipe is its flexibility. And honestly, the imperfections make them cuter—a slightly crooked whisker or uneven eye just adds character.
I’d love to hear how yours turn out! Drop a comment below with your variations or tag me in your photos. Happy Halloween, and happy baking. You’ve got this.
Frequently Asked Questions
Can I use liquid food coloring instead of gel?
I really don’t recommend it. Liquid food coloring adds too much moisture to the dough, which causes the cookies to spread and lose their shape. Gel coloring is concentrated and won’t affect the texture. It’s worth the extra trip to the store.
Why did my cookies spread into blobs?
This usually happens for one of two reasons: the dough wasn’t chilled long enough, or the butter was too soft when you mixed it. Make sure your butter is softened but still cool to the touch, and always chill the cut-out cookies for at least 10 minutes before baking.
Can I make these cookies ahead of time?
Absolutely. You can make the dough up to 3 days ahead and keep it in the fridge. Or bake the cookies, cool them completely, and store them undecorated for up to 5 days. Add the frosting just before serving for the freshest look.
How do I get the black color really dark?
Use a high-quality black gel food coloring like AmeriColor Super Black. Start with 1 tablespoon and add more until you reach your desired shade. The color will deepen slightly as the dough chills, so go a shade lighter than you think you need.
Can I freeze the decorated cookies?
I don’t recommend freezing cookies after they’ve been frosted. The frosting can get weepy and the colors may bleed. Instead, freeze the undecorated cookies and add the frosting after thawing. They’ll look and taste much better.
Pin This Recipe!

Best Easy Black Cat Halloween Sugar Cookies Recipe
These adorable black cat Halloween sugar cookies are soft in the middle with slightly crisp edges, featuring classic buttery vanilla flavor and festive orange frosting details. Perfect for last-minute Halloween parties, school events, or a fun baking afternoon with the kids.
- Prep Time: 15 minutes
- Cook Time: 10 minutes
- Total Time: 45 minutes (including 30 minutes chill time)
- Yield: 24 servings 1x
- Category: Dessert
- Cuisine: American
Ingredients
- 2 ¾ cups all-purpose flour (spooned and leveled)
- 1 teaspoon baking powder
- ½ teaspoon salt
- 1 cup unsalted butter, softened
- 1 ½ cups granulated sugar
- 1 large egg, room temperature
- 2 teaspoons vanilla extract
- 1–2 tablespoons black gel food coloring
- ½ cup unsalted butter, softened (for frosting)
- 2 cups powdered sugar, sifted (for frosting)
- 2 tablespoons heavy cream (for frosting)
- ½ teaspoon vanilla extract (for frosting)
- Orange gel food coloring (for frosting)
Instructions
- Make the Cookie Dough: In a medium bowl, whisk together 2 ¾ cups all-purpose flour, 1 teaspoon baking powder, and ½ teaspoon salt. Set aside. In a large bowl, beat 1 cup softened unsalted butter and 1 ½ cups granulated sugar together until light and fluffy—about 3 minutes on medium speed. Scrape down the sides of the bowl. Add 1 large egg and 2 teaspoons vanilla extract, then beat until combined. The mixture should look smooth and creamy.
- Add the Color: Gradually add the dry ingredients to the wet mixture, mixing on low speed until just combined. Don’t overmix or your cookies will be tough. Add 1 tablespoon of black gel food coloring and mix until the color is even. If the dough looks more dark gray than black, add another tablespoon. The color will deepen slightly as the dough chills, so aim for a shade darker than you think you need.
- Chill the Dough: Divide the dough into two discs, wrap each in plastic wrap, and refrigerate for at least 30 minutes. This step is crucial—if you skip it, your cats will spread into shapeless blobs. For best results, chill for an hour. You can even make the dough a day ahead and keep it in the fridge.
- Roll and Cut: Preheat your oven to 350°F (175°C). Line two baking sheets with parchment paper. On a lightly floured surface, roll one disc of dough to about ¼-inch thickness. Flour your rolling pin if the dough starts to stick. Use your black cat cutter to cut out shapes, then carefully transfer them to the prepared baking sheets, spacing them about 2 inches apart. Gather the scraps, re-roll, and cut again.
- Bake: Bake for 8-10 minutes, or until the edges are just set. The cookies won’t look golden because they’re black, so watch for the edges to look slightly dry. Remove from the oven and let them cool on the baking sheet for 5 minutes, then transfer to a wire rack to cool completely. They’ll firm up as they cool.
- Make the Frosting: While the cookies cool, make the frosting. Beat ½ cup softened unsalted butter until creamy. Gradually add 2 cups sifted powdered sugar, beating on low speed until combined. Add 2 tablespoons heavy cream and ½ teaspoon vanilla extract, then beat on medium-high for 2 minutes until light and fluffy. Set aside about ¼ cup of the frosting and tint it orange with gel food coloring.
- Decorate: Once the cookies are completely cool, use the white frosting to pipe two small eyes on each cat. Then use the orange frosting to add a tiny dot in the center of each eye—this gives them that cute, alive look. For the whiskers, use a toothpick dipped in white frosting to draw three thin lines on each side of the face. Let the frosting set for about 15 minutes before serving.
Notes
Chilling the dough is crucial to prevent spreading. Use gel food coloring, not liquid, to avoid altering dough texture. For best results, chill cut-out cookies for 10 minutes before baking. Store in an airtight container at room temperature for up to 5 days. Freeze undecorated cookies for up to 3 months.
Nutrition
- Serving Size: 1 cookie
- Calories: 180
- Sugar: 12
- Sodium: 80
- Fat: 9
- Saturated Fat: 5
- Carbohydrates: 24
- Protein: 2
Keywords: Halloween cookies, sugar cookies, black cat cookies, Halloween dessert, easy cookies, festive cookies, butter cookies, vanilla cookies


