Love this? Save it for later!
Share the inspiration with your friends
“I was up past midnight, rummaging through the kitchen for a quick bite,” I confessed to my roommate one groggy morning. The fridge was mostly empty, and honestly, I wasn’t in the mood to fire up the oven or wait forever for something sweet to bake. That’s when I found a dusty jar of peanut butter lurking behind the milk and a lonely bar of chocolate hiding in the pantry. Cue a little experiment with just four simple ingredients — and bam! These easy no-bake peanut butter chocolate bars were born.
Let me tell you, these bars quickly became my go-to for those nights when I want something sweet, satisfying, but without the fuss. I mean, who has time for complicated recipes on a busy day or after a long shift? Maybe you’ve been there too — staring at a kitchen full of ingredients but no motivation to cook. This recipe was a lifesaver, especially because it doesn’t ask for fancy stuff or endless steps.
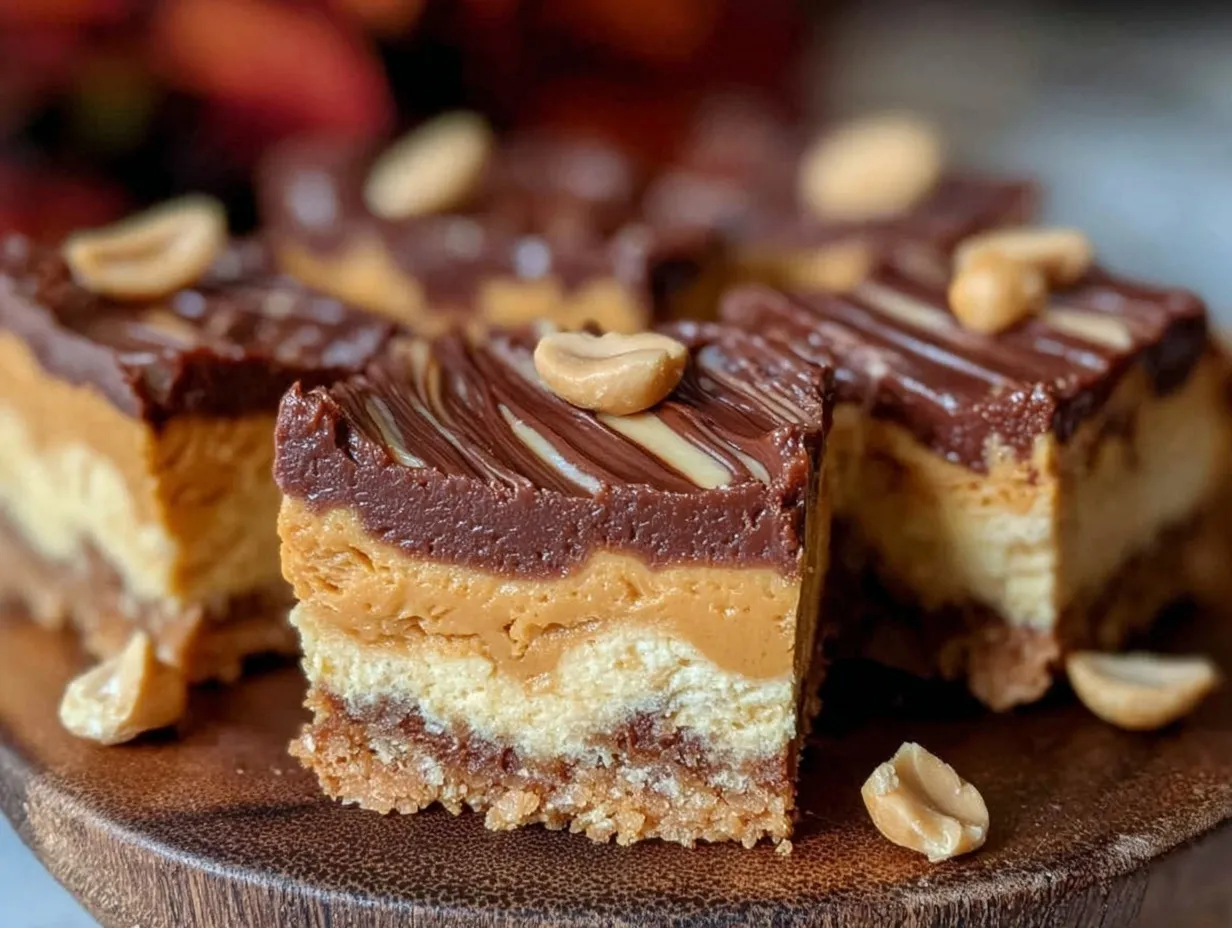
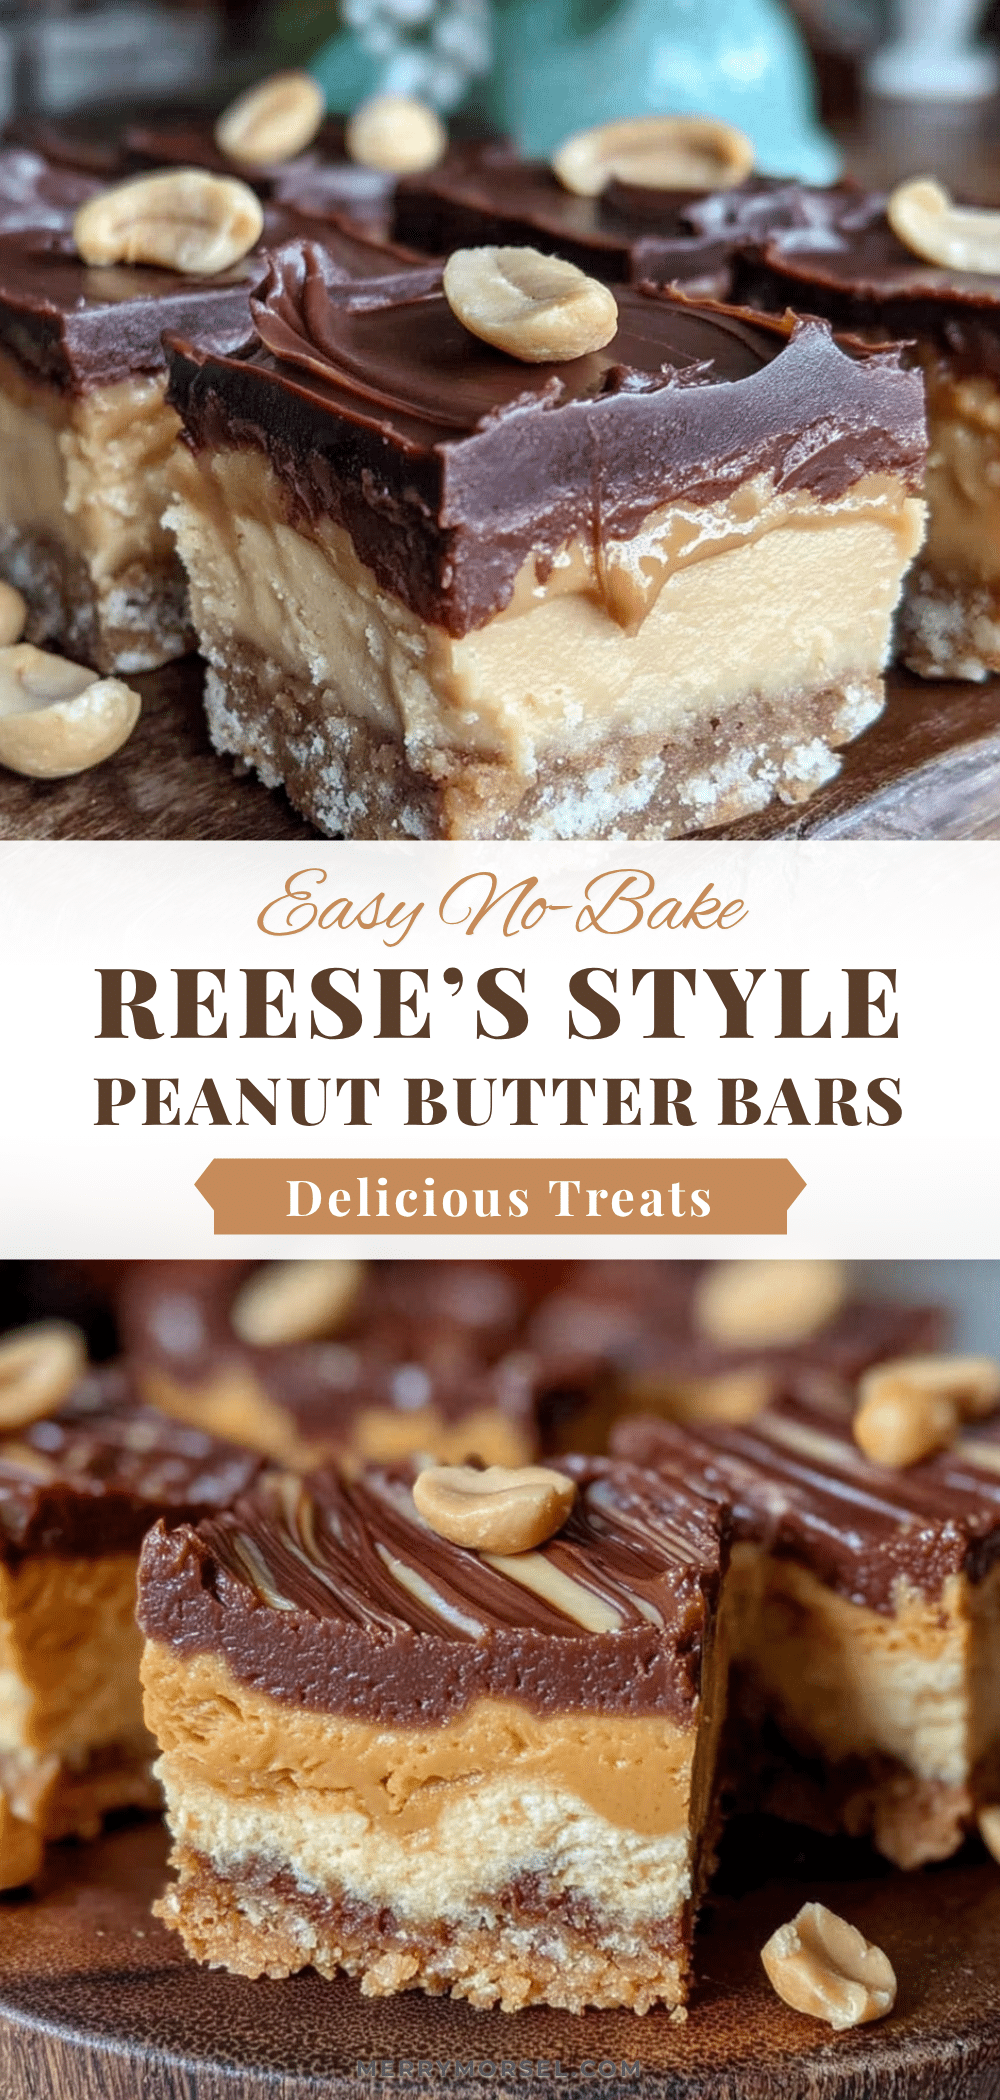
Sure, I did make a mess (there was peanut butter on the counter, the floor, and probably my shirt), and at one point, I realized I forgot to line the pan. But that imperfect first batch? It tasted incredible. It’s the kind of treat that hits the spot just right: creamy peanut butter paired with rich chocolate, all held together in a chewy, no-bake bar. Honestly, I keep coming back to this recipe because it’s reliable, simple, and, well, downright addictive.
Why You’ll Love This Recipe
After testing this recipe multiple times (and yes, taste-testing every batch), I’m confident you’ll find it as fuss-free and delicious as I do. Here’s what makes these no-bake peanut butter chocolate bars stand out:
- Quick & Easy: Ready in under 20 minutes — perfect for busy weeknights or last-minute snack cravings.
- Simple Ingredients: Just four pantry staples that you probably have on hand already — no complicated shopping trips.
- Perfect for Gifting: These bars make a thoughtful homemade gift for friends or a sweet addition to any potluck.
- Crowd-Pleaser: Kids and adults alike can’t get enough of the classic peanut butter-chocolate combo.
- Unbelievably Delicious: The creamy, slightly salty peanut butter balances beautifully with the smooth chocolate topping, creating a texture that’s chewy yet melt-in-your-mouth.
What’s different about this recipe? Well, the magic is in the simplicity. No fancy machinery or exotic ingredients needed. The secret is in the ratio — just the right amount of peanut butter, a touch of sweetness, and a chocolate layer that seals everything perfectly. This isn’t just another peanut butter bar; it’s the one you’ll want to make on repeat.
Plus, this recipe is flexible. I’ve made it during lazy Sunday afternoons and last-minute snack attacks alike. It’s comfort food without the guilt, and honestly, it’s the kind of thing that makes you close your eyes after the first bite and smile.
What Ingredients You Will Need
This recipe uses simple, wholesome ingredients to deliver bold flavor and satisfying texture without the fuss. Each component plays a crucial role in creating those perfect no-bake peanut butter chocolate bars.
- Peanut Butter (1 cup / 240 ml): Creamy works best for smooth bars, but natural peanut butter is great if you prefer a slightly grainy texture. I usually grab Skippy for its consistent creaminess.
- Honey (1/3 cup / 80 ml): Acts as the natural sweetener and binder. Maple syrup is a fine substitute if you want a vegan option.
- Oats (2 cups / 180 g): Old-fashioned rolled oats provide chewiness and structure. Quick oats tend to make the bars too soft, so stick with rolled oats for best results.
- Chocolate Chips (1 cup / 175 g): Semi-sweet chocolate chips melt into a luscious topping. I’m partial to Ghirardelli for its rich flavor and smooth melting.
Optional tips: If you want to mix things up, try stirring in a pinch of sea salt into the peanut butter mixture to bring out the chocolate’s richness. For a gluten-free version, make sure to use certified gluten-free oats.
Equipment Needed
- Mixing Bowl: A medium-sized bowl for combining your ingredients. I prefer glass or stainless steel for easy cleanup.
- Spatula or Spoon: To stir the peanut butter and honey mixture and fold in the oats.
- 8×8 Inch (20×20 cm) Baking Pan: For pressing the mixture into bars. If you don’t have an 8×8 pan, a 9×9 will work fine; just adjust thickness slightly.
- Parchment Paper: Line your pan to make removal a breeze — trust me, this step saves you some frustration!
- Microwave or Double Boiler: To melt the chocolate chips smoothly. I find the microwave is faster, but a double boiler gives more control.
If you’re on a budget, you can substitute the baking pan with a loaf pan or even a small casserole dish. Just keep an eye on bar thickness when cutting. Also, if you don’t have parchment paper, lightly greasing the pan works, but bars might stick a little.
Preparation Method
- Prepare Your Pan (5 minutes): Line an 8×8 inch (20×20 cm) baking pan with parchment paper, leaving some overhang on the sides for easy lifting later.
- Mix Peanut Butter and Honey (3 minutes): In a medium bowl, combine 1 cup (240 ml) creamy peanut butter with 1/3 cup (80 ml) honey. Stir until smooth and well combined. If the mixture feels too thick, warm it slightly in the microwave (about 15 seconds) to soften.
- Add Oats (2 minutes): Stir in 2 cups (180 g) rolled oats until fully coated and evenly distributed. The mixture will be sticky but should hold together.
- Press Into Pan (5 minutes): Transfer the mixture to your prepared pan. Using the back of a spoon or spatula, firmly press it down into an even layer. This step is key to bars holding shape later.
- Melt Chocolate (3-5 minutes): Melt 1 cup (175 g) semi-sweet chocolate chips in a microwave-safe bowl in 20-second bursts, stirring between each, until smooth. Alternatively, melt over a double boiler on low heat, stirring constantly.
- Spread Chocolate Topping (2 minutes): Pour the melted chocolate evenly over the pressed oat mixture. Use an offset spatula or back of a spoon to smooth it out gently.
- Chill to Set (30 minutes): Place the pan in the refrigerator and let the bars chill for at least 30 minutes or until the chocolate is firm.
- Cut and Serve (5 minutes): Lift the bars out using the parchment overhang. Cut into 12 squares with a sharp knife. For cleaner cuts, wipe the knife between slices.
Pro tip: If your peanut butter mixture feels too crumbly or dry, add a teaspoon of warm water or a touch more honey to help bind. Also, don’t skip chilling — it makes cutting the bars much easier and prevents them from falling apart.
Cooking Tips & Techniques
When making these easy no-bake peanut butter chocolate bars, a few tricks can really make a difference.
- Use Room Temperature Ingredients: It helps the peanut butter and honey blend smoothly without lumps.
- Press Firmly: The tighter you press the oat mixture into the pan, the better the bars hold together. I learned this the hard way after my first batch crumbled everywhere.
- Chocolate Melting: Avoid overheating chocolate — it can seize and become grainy. Melt gently and stir frequently.
- Cutting Bars: Warm your knife under hot water, dry it, then slice for the cleanest edges.
- Multitasking: While the bars chill, clean your workspace or prep a cup of tea — that 30-minute wait flies by!
Honestly, I used to think no-bake bars were just quick fixes, but this recipe proved they can be reliable, tasty treats that don’t require babysitting or fancy equipment.
Variations & Adaptations
Feel like mixing things up? These bars are surprisingly adaptable to your taste and dietary needs.
- Nut-Free Version: Swap peanut butter for sunflower seed butter. The flavor changes but the texture stays great.
- Chocolate Variety: Use dark chocolate or milk chocolate chips depending on your preference. You can even sprinkle chopped nuts on top before chilling.
- Added Crunch: Stir in 1/4 cup chopped pretzels or roasted peanuts into the oat mixture for extra texture.
- Vegan Option: Use maple syrup instead of honey and make sure your chocolate chips are dairy-free.
- Seasonal Twist: Add a teaspoon of cinnamon or a pinch of cayenne for a spicy kick during the holidays.
One time, I tried adding shredded coconut to the mix — it was a fun twist that gave a tropical vibe to these classic bars!
Serving & Storage Suggestions
These bars are perfect served chilled or at room temperature. I like to keep them refrigerated, especially in warmer months, to maintain their shape and texture.
They pair wonderfully with a glass of cold milk or a cup of coffee for a quick afternoon pick-me-up. For a snack tray, these bars complement fresh fruit or a cheese platter nicely.
To store, place the bars in an airtight container layered with parchment paper between layers. They’ll keep well in the fridge for up to a week and freeze beautifully for up to 3 months.
When reheating, let them sit at room temperature for 10 minutes before eating to soften slightly or microwave for 10 seconds if you want a gooey treat.
Flavors deepen after a day or two, so if you can wait, the bars taste even better the next day!
Nutritional Information & Benefits
Each bar (based on 12 servings) roughly contains:
| Calories | 180 kcal |
|---|---|
| Protein | 5 g |
| Fat | 11 g |
| Carbohydrates | 16 g |
| Fiber | 2 g |
These bars bring a good balance of protein and healthy fats thanks to the peanut butter, while oats add fiber and slow-release energy. Using honey keeps the sweetness natural, avoiding refined sugars.
They’re gluten-free if you use certified oats and are low in sodium. Just watch the portion size to keep calories in check if you’re mindful of that.
From my wellness perspective, these bars satisfy sweet cravings without the crash that comes from overly processed snacks, making them a smarter choice for an everyday treat.
Conclusion
So, why try this easy no-bake peanut butter chocolate bars recipe? Because it’s quick, simple, and truly hits that comfort-food sweet spot without demanding a lot of time or fancy gadgets. I love how just four ingredients can come together to make something so satisfying and versatile.
Feel free to tweak it to suit your taste — whether that’s adding a sprinkle of sea salt, swapping nut butters, or trying different chocolates. This recipe is forgiving, fun, and always a hit with whoever tries it.
Give it a shot, and I’d love to hear how your batch turns out or what variations you try! Don’t hesitate to leave a comment or share your own peanut butter chocolate bar story — let’s keep this tasty tradition going.
Remember, sometimes the simplest recipes become your favorites. Here’s to many more sweet moments made easier!
Frequently Asked Questions
Can I use crunchy peanut butter instead of creamy?
Yes, you can! Crunchy peanut butter will add extra texture, which some people really enjoy. Just be aware it might make the bars a bit less smooth.
Do these bars need to be refrigerated?
It’s best to keep them refrigerated to maintain firmness, especially in warm weather. However, they can be served at room temperature if preferred.
Can I substitute the oats with another grain?
Rolled oats provide the best texture, but you could try puffed quinoa or crushed cereal flakes. Just expect a different texture and adjust quantities as needed.
How long do these bars last in the freezer?
Stored in an airtight container, they last up to 3 months frozen. Thaw in the fridge overnight before enjoying.
Is there a way to make these bars less sweet?
Absolutely! Reduce the honey by a tablespoon or two, or use dark chocolate with a higher cocoa percentage for a less sweet topping.
Pin This Recipe!
Easy No-Bake Peanut Butter Chocolate Bars

A quick and simple no-bake recipe using just four ingredients to create chewy, creamy peanut butter bars topped with rich chocolate. Perfect for busy days or last-minute sweet cravings.
- Prep Time: 15 minutes
- Cook Time: 0 minutes
- Total Time: 45 minutes
- Yield: 12 bars 1x
- Category: Dessert
- Cuisine: American
Ingredients
- 1 cup (240 ml) creamy peanut butter
- 1/3 cup (80 ml) honey (maple syrup as vegan substitute)
- 2 cups (180 g) old-fashioned rolled oats
- 1 cup (175 g) semi-sweet chocolate chips
Instructions
- Line an 8×8 inch (20×20 cm) baking pan with parchment paper, leaving some overhang for easy lifting.
- In a medium bowl, combine peanut butter and honey. Stir until smooth. Warm slightly if too thick.
- Stir in rolled oats until fully coated and evenly distributed.
- Transfer mixture to prepared pan and press firmly into an even layer.
- Melt chocolate chips in microwave-safe bowl in 20-second bursts, stirring until smooth, or melt over a double boiler.
- Pour melted chocolate evenly over oat mixture and smooth with spatula.
- Refrigerate for at least 30 minutes until chocolate is firm.
- Lift bars out using parchment overhang and cut into 12 squares. Wipe knife between cuts for clean edges.
Notes
Use room temperature ingredients for smooth mixing. Press mixture firmly into pan to prevent crumbling. Melt chocolate gently to avoid seizing. Chill bars thoroughly before cutting. Warm knife under hot water for clean cuts. For vegan version, substitute honey with maple syrup and use dairy-free chocolate chips. Optional: add sea salt, chopped nuts, or cinnamon for variations.
Nutrition
- Serving Size: 1 bar (1/12th of rec
- Calories: 180
- Fat: 11
- Carbohydrates: 16
- Fiber: 2
- Protein: 5
Keywords: no-bake, peanut butter, chocolate bars, easy recipe, quick dessert, healthy snack, gluten-free option, vegan option