Love this? Save it for later!
Share the inspiration with your friends
“You ever get that one dish that just changes everything?” my friend Mark asked me one evening, waving a spoonful of chili crisp oil over a bowl of plain noodles. Honestly, I was skeptical at first. I mean, chili oil? How different could it be from the stuff you buy in jars at the supermarket? But watching that golden, bubbling oil cascade over his simple dinner, I knew I had to learn his secret.
Mark wasn’t some professional chef—just a guy who loved experimenting in his tiny apartment kitchen on a rainy Thursday night in Seattle. He shared this spicy, crunchy chili crisp recipe that he’d tweaked after a few trial-and-error sessions. The smell alone was intoxicating: smoky, fiery, with a hint of sweetness that pulled me in like a magnet.
What struck me most was how this homemade chili crisp oil transformed the most basic meals—steamed rice, scrambled eggs, even roasted vegetables—into something utterly crave-worthy. I remember almost burning the kitchen once trying to replicate it myself, juggling timers and stirring furiously, but the end result was worth every bit of the chaos. This chili crisp oil recipe stuck with me, and honestly, I keep a jar in my fridge all the time now. Maybe you’ve been there, staring at a bland dinner, wishing for that little something to wake it up? That’s exactly what this chili crisp does. Let me tell you, once you make it yourself, store-bought versions won’t cut it anymore.
Why You’ll Love This Recipe
After countless tests and adjustments, this flavorful homemade chili crisp oil recipe became my go-to for adding boldness without fuss. It’s genuinely a kitchen game-changer, and here’s why:
- Quick & Easy: Comes together in under 30 minutes, perfect for busy nights or last-minute flavor boosts.
- Simple Ingredients: Uses pantry staples and easily found spices—no specialty stores needed.
- Perfect for Any Meal: Whether it’s breakfast eggs, lunch noodles, or dinner stir-fry, this chili crisp adds that satisfying crunch and heat.
- Crowd-Pleaser: Friends and family always ask for the recipe, and it’s a hit at potlucks and casual get-togethers.
- Unbelievably Delicious: The balance of smoky, spicy, and slightly sweet flavors keeps you coming back for more.
What sets this chili crisp oil apart is the method of slow infusing the oil with aromatics and toasting the chili flakes just right—not too bitter, not too mild. I also toss in a little toasted sesame seeds for that subtle nuttiness that makes it feel homemade, not factory-made. Honestly, it’s not just chili oil; it’s a flavor experience that makes you close your eyes after the first bite.
It’s the kind of recipe that turns everyday meals into something memorable, without adding extra stress. Perfect if you want to impress guests or simply treat yourself to something special after a long day.
What Ingredients You Will Need
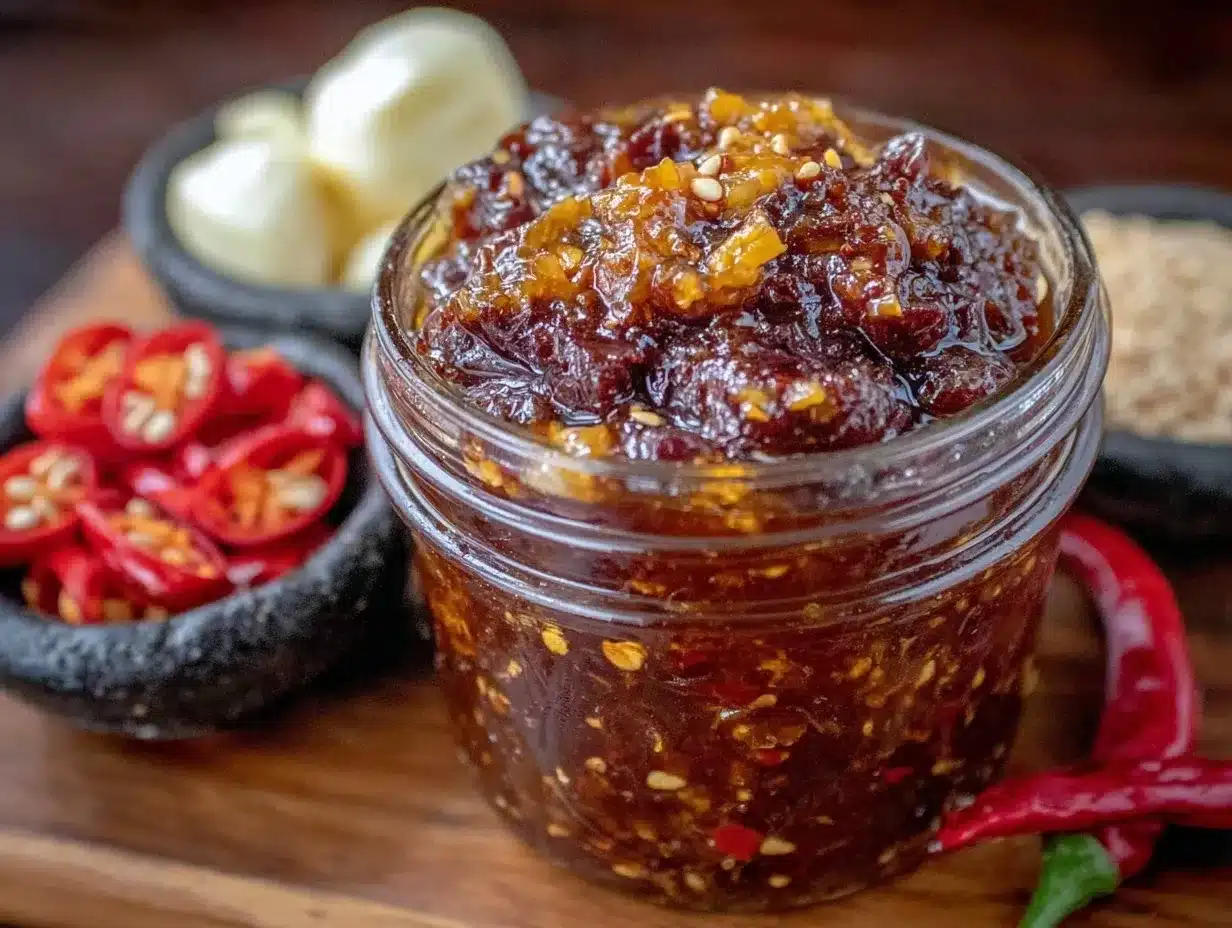
This chili crisp oil recipe depends on straightforward, wholesome ingredients that pack a punch without fuss. Most of these are pantry staples, so you might already have them on hand.
- Neutral Oil (1 cup / 240 ml): I prefer avocado oil or grapeseed oil for their high smoke points and clean flavor.
- Dried Red Chili Flakes (1/3 cup / 25 g): Look for coarse flakes with seeds for that authentic crunch and heat. Brands like McCormick or Lao Gan Ma’s chili flakes work well.
- Garlic (4 cloves, minced): Adds savory depth; fresh is best.
- Shallots (2 medium, thinly sliced): For a subtle sweetness and crunch.
- Sichuan Peppercorns (1 tablespoon): Optional but highly recommended for that tingly, numbing sensation that lifts the flavor.
- Ginger (1-inch piece, peeled and thinly sliced): Adds warmth and complexity.
- Sugar (1 teaspoon): Balances the heat with a touch of sweetness.
- Salt (1 teaspoon): Enhances all the flavors.
- Toasted Sesame Seeds (2 tablespoons): Adds nuttiness and texture.
- Soy Sauce (1 tablespoon, optional): For a subtle umami boost if desired.
If you can’t find Sichuan peppercorns, don’t sweat it—your chili crisp will still shine. For a gluten-free version, swap soy sauce with tamari or coconut aminos. In summer, I sometimes add a pinch of dried orange zest to brighten things up. Honestly, the recipe is forgiving, so feel free to personalize it.
Equipment Needed
- Small saucepan or skillet: For gently heating the oil and toasting aromatics.
- Heatproof glass jar or container: To store your chili crisp oil safely.
- Fine mesh strainer: Optional, if you prefer a smoother oil without bits.
- Wooden spoon or heat-safe spatula: For stirring ingredients during cooking.
- Measuring cups and spoons: For precise ingredient amounts.
If you don’t have a fine mesh strainer, no worries! I usually leave the crispy bits in because that’s the best part (honestly). A budget-friendly tip: a simple glass jar with a tight lid works perfectly for storage and keeps the oil fresh for weeks.
Preparation Method
- Prepare your ingredients: Thinly slice the shallots and ginger, mince the garlic, and measure out the chili flakes, sesame seeds, and spices. This usually takes about 10 minutes.
- Toast the aromatics: Heat the neutral oil in a small saucepan over medium heat until shimmering (about 275°F / 135°C if you have a thermometer). Add the garlic, shallots, ginger, and Sichuan peppercorns. Stir gently for about 5-7 minutes until the shallots are golden and fragrant but not burnt. Keep a close eye here—burnt shallots can ruin the flavor.
- Infuse the chili flakes: Remove the saucepan from heat and immediately stir in the dried chili flakes, sugar, salt, and toasted sesame seeds. The residual heat will toast the chili flakes just enough without burning them. Let the mixture cool for 15 minutes.
- Optional soy sauce addition: Once the mixture has cooled slightly, stir in the soy sauce for added umami complexity.
- Transfer and store: Pour the chili crisp oil into a clean, heatproof jar. Let it cool to room temperature before sealing with a lid. It’s ready to use immediately but tastes even better after a day or two as the flavors meld.
Pro tip: If you like your chili crisp oil with more crunch, add a handful of crushed roasted peanuts or fried shallots on top before storing. Just remember, the oil will solidify slightly when refrigerated—warm it gently before using if needed.
Cooking Tips & Techniques
Making chili crisp oil at home can feel tricky the first time, but a few tips make it much simpler and tastier:
- Keep the oil temperature moderate: Too hot and the garlic or shallots burn, creating bitterness. Too low and you won’t get that deep, toasty flavor.
- Use a thermometer if you can: Aim for around 275°F (135°C) for frying aromatics—this keeps everything golden but not scorched.
- Don’t rush the cooling: Adding chili flakes into hot oil immediately helps toast them without burning. The timing here is key.
- Experiment with chili types: Mix in crushed red pepper flakes, smoked paprika, or even chipotle powder for different flavor profiles.
- Watch your garlic closely: Garlic burns fast and ruins the whole batch. If you see dark spots, remove the pan from heat promptly.
- Make a double batch: This oil stores well in the fridge for up to a month, so you’ll have it ready whenever you want to add a spicy kick to crispy garlic chicken or other favorites.
Honestly, I once forgot about my oil on the stove for a few seconds too long and ended up with a smoky kitchen (and a slightly bitter chili crisp). Lesson learned: patience is your best friend here.
Variations & Adaptations
This recipe is a great jumping-off point, and you can easily tweak it to suit your preferences or dietary needs.
- Vegan & Gluten-Free: Use coconut aminos instead of soy sauce, and skip any animal-based ingredients for a fully plant-based option.
- Extra Crunch: Add crushed roasted peanuts or fried garlic chips for additional texture.
- Milder Version: Reduce chili flakes by half and add more toasted sesame seeds for a gentler, nutty flavor.
- Herbal Twist: Toss in some dried oregano or rosemary during the oil infusion for an unexpected but delightful herbal note.
- Smoky Flair: Swap some chili flakes with smoked paprika or chipotle powder for a deep smoky taste.
I once tried adding a splash of toasted rice vinegar for a tangy punch, which was surprisingly good on steamed dumplings. Feel free to get creative; this chili crisp oil loves to surprise.
Serving & Storage Suggestions
This chili crisp oil shines best when drizzled warm or at room temperature. Here are some ways to enjoy and store it:
- Serving: Spoon over steamed rice, noodles, roasted veggies, or as a dip for dumplings. It also pairs beautifully with scrambled eggs or grilled meats.
- Storage: Keep in a sealed jar in the refrigerator for up to 4 weeks. The oil may solidify slightly when cold—just warm gently in a microwave or over a double boiler before use.
- Flavor Development: The longer it sits, the more the flavors meld and deepen. I often find it tastes better on day two or three.
- Presentation: Serve in a small bowl with a tiny spoon for sharing at the table, or swirl some into your favorite dishes for an instant upgrade.
Honestly, this chili crisp oil has become my secret weapon for quick weeknight dinners. You can even add a bit to homemade sauces, like the tangy glaze in my sweet and spicy glazed chicken, for an extra layer of flavor.
Nutritional Information & Benefits
One tablespoon of this chili crisp oil roughly contains about 120 calories, mostly from healthy fats in the oil itself.
The key ingredients bring more than flavor:
- Chili Peppers: Rich in capsaicin, which may support metabolism and provide anti-inflammatory benefits.
- Garlic & Ginger: Known for their immune-boosting and digestive properties.
- Sichuan Peppercorns: Adds a unique tingling sensation and may aid digestion.
This oil is naturally gluten-free and vegan (if you skip soy sauce or use gluten-free tamari). Just note it’s spicy, so adjust portion size if you’re sensitive to heat. I love having this on hand because it adds bold flavor without extra carbs or sugar.
Conclusion
If you’re looking for a simple, flavorful homemade chili crisp oil that can transform any dish, this recipe is a keeper. It’s approachable, packed with personality, and brings that perfect balance of heat, crunch, and savory depth you didn’t know you needed.
Feel free to tweak the spice level or add your favorite mix-ins. I promise, once you try making this yourself, you’ll wonder why you ever settled for store-bought versions. It’s become a kitchen staple for me, and I hope it does the same for you.
Give it a shot, and drop a comment below sharing how you used your chili crisp oil or any fun twists you came up with. Let’s get cooking—and spicing—together!
FAQs
What can I use chili crisp oil on?
It’s incredibly versatile! Try it on noodles, rice, eggs, dumplings, roasted veggies, grilled meats, or even as a dip for bread or spring rolls.
How long does homemade chili crisp oil last?
Stored in a sealed jar in the refrigerator, it typically lasts up to 4 weeks. Always check for any off smells or mold before use.
Can I make this chili crisp oil less spicy?
Yes! Reduce the amount of chili flakes or use milder chili powders. Adding more toasted sesame seeds can also mellow the heat while adding crunch.
Do I need to strain the oil?
Not at all. Leaving the crispy bits in adds texture and flavor. But if you prefer a smoother oil, you can strain it through a fine mesh sieve before storing.
Is this chili crisp oil gluten-free?
It can be, especially if you use gluten-free tamari or skip soy sauce altogether. The base ingredients are naturally gluten-free.
Pin This Recipe!
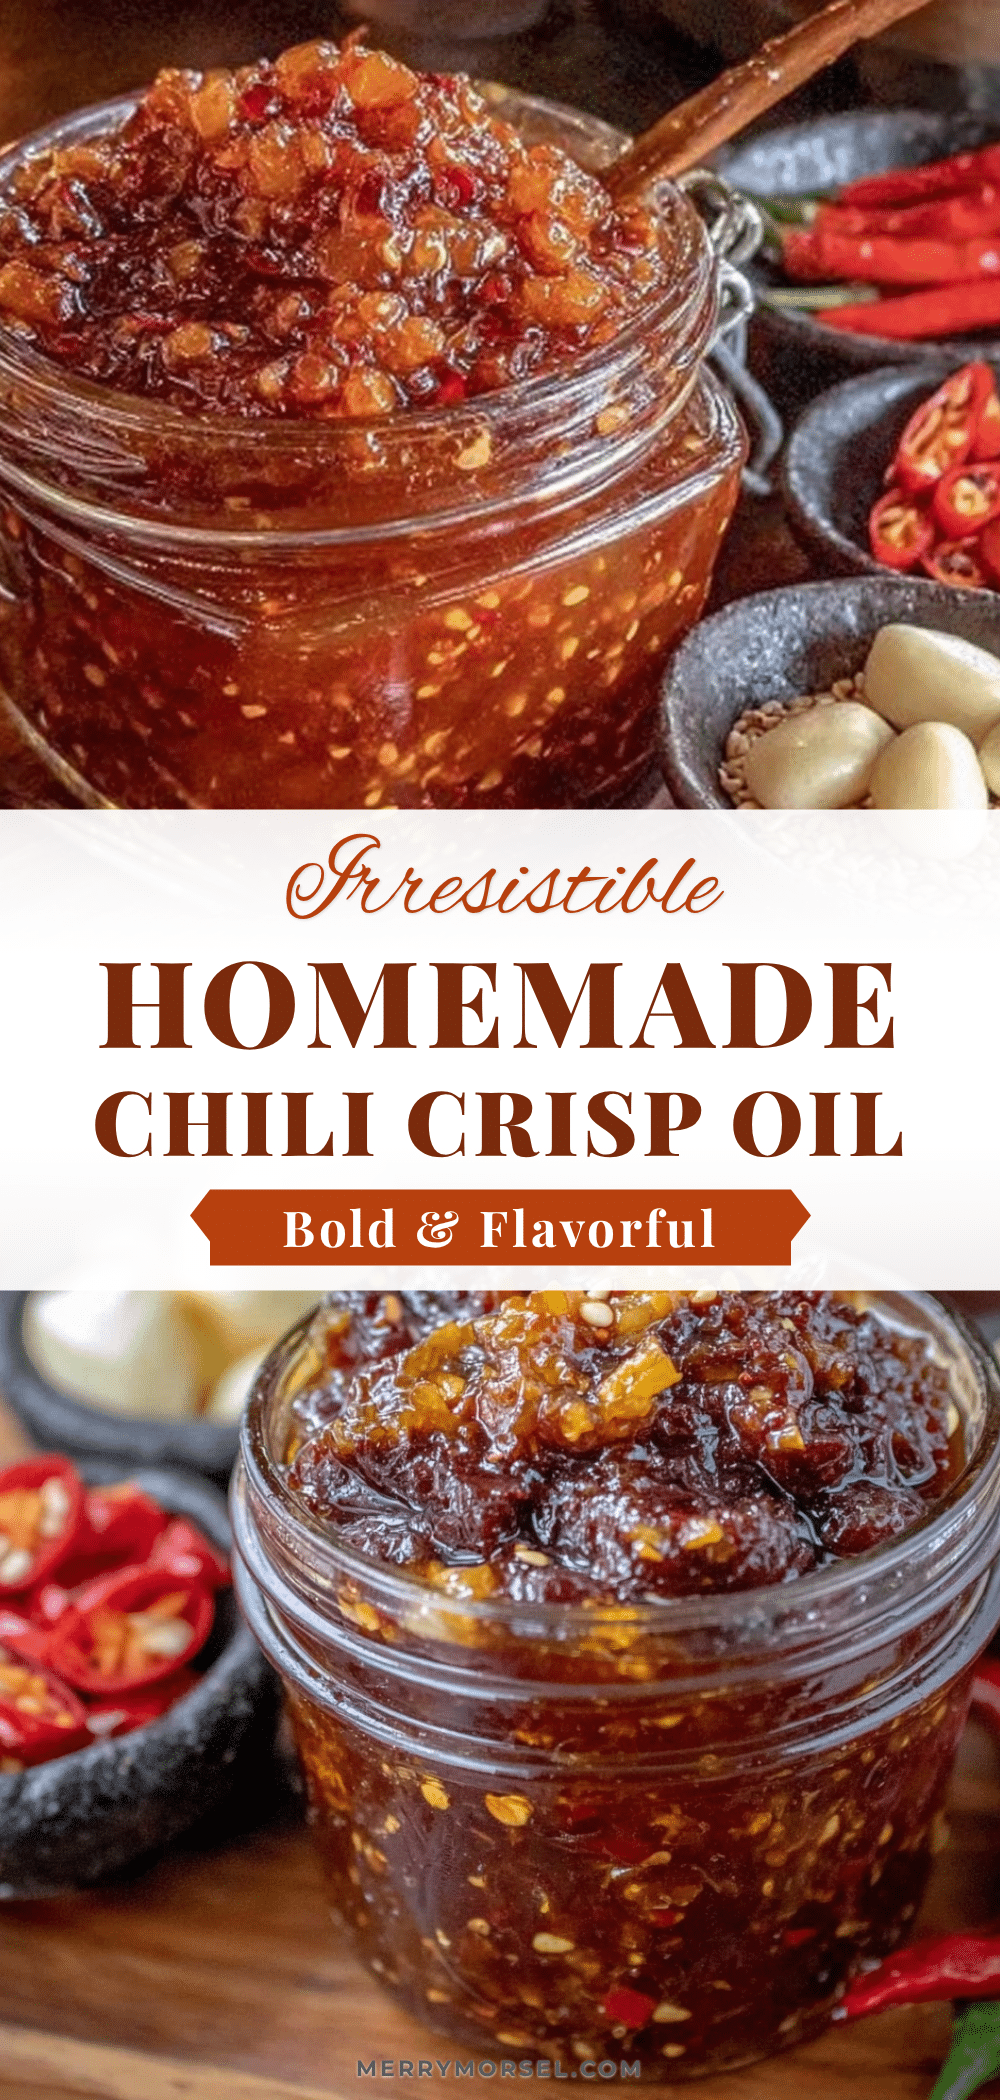
Flavorful Homemade Chili Crisp Oil Recipe Easy 3-Step Guide

A quick and easy homemade chili crisp oil recipe that adds bold, smoky, and spicy flavor with a satisfying crunch to any meal. Perfect for drizzling over rice, noodles, eggs, and more.
- Prep Time: 10 minutes
- Cook Time: 15 minutes
- Total Time: 25 minutes
- Yield: About 1 cup (approximately 8 servings, 1 tablespoon each) 1x
- Category: Condiment
- Cuisine: Chinese
Ingredients
- 1 cup neutral oil (avocado oil or grapeseed oil preferred)
- 1/3 cup dried red chili flakes (coarse with seeds)
- 4 cloves garlic, minced
- 2 medium shallots, thinly sliced
- 1 tablespoon Sichuan peppercorns (optional)
- 1-inch piece ginger, peeled and thinly sliced
- 1 teaspoon sugar
- 1 teaspoon salt
- 2 tablespoons toasted sesame seeds
- 1 tablespoon soy sauce (optional)
Instructions
- Prepare your ingredients: thinly slice the shallots and ginger, mince the garlic, and measure out the chili flakes, sesame seeds, and spices (about 10 minutes).
- Toast the aromatics: heat the neutral oil in a small saucepan over medium heat until shimmering (about 275°F / 135°C). Add garlic, shallots, ginger, and Sichuan peppercorns. Stir gently for 5-7 minutes until shallots are golden and fragrant but not burnt.
- Infuse the chili flakes: remove saucepan from heat and immediately stir in dried chili flakes, sugar, salt, and toasted sesame seeds. Let the mixture cool for 15 minutes.
- Optional: once cooled slightly, stir in soy sauce for added umami.
- Transfer the chili crisp oil into a clean, heatproof jar. Let cool to room temperature before sealing. Ready to use immediately but tastes better after 1-2 days.
Notes
Keep oil temperature moderate to avoid burning garlic and shallots. Use a thermometer if possible to maintain about 275°F (135°C). Let chili flakes toast in residual heat to avoid bitterness. The oil solidifies when refrigerated; warm gently before use. Add crushed peanuts or fried shallots for extra crunch. Soy sauce can be replaced with tamari or coconut aminos for gluten-free version.
Nutrition
- Serving Size: 1 tablespoon
- Calories: 120
- Sugar: 0.5
- Sodium: 230
- Fat: 14
- Saturated Fat: 2
- Carbohydrates: 1
- Fiber: 0.5
- Protein: 0.3
Keywords: chili crisp oil, homemade chili oil, spicy condiment, Sichuan peppercorn, chili flakes, chili oil recipe, vegan chili oil, gluten-free chili oil