Love this? Save it for later!
Share the inspiration with your friends
“You know, I wasn’t even planning to bring anything to the neighborhood block party,” I confessed to my friend as we unloaded our cars last summer. The truth is, I had completely blanked on what to make until 30 minutes before we had to leave. Panic set in—I mean, who wants to show up empty-handed? Then my neighbor, Jen, popped over with a bowl of this layered taco dip that caught everyone’s attention immediately.
The sizzle of the fresh jalapeños, the creamy swirl of sour cream perfectly mingling with the seasoned beans, and the colorful bursts of tomatoes and olives made it impossible to resist. I had to ask for the recipe right then and there, scribbling it down on a napkin while juggling chips and kids. Honestly, it felt like a secret weapon for any party—easy, crowd-pleasing, and ridiculously tasty.
Since that day, this perfect layered taco dip has become my go-to appetizer, especially when time is tight, but the stakes are high (you know that feeling when you want to impress but also keep it simple?). It’s that kind of recipe that steals the party spotlight without any fuss. Let me tell you, the way those layers come together—each bite a creamy, crunchy, spicy little party in your mouth—is something I keep coming back to, over and over.
Why You’ll Love This Recipe
Having tested this layered taco dip countless times, I can say it ticks all the boxes for a winning party appetizer. Whether you’re a seasoned host or a last-minute bringer, this recipe delivers every single time.
- Quick & Easy: You can whip this up in under 20 minutes, perfect for busy weeknights or those surprise invites.
- Simple Ingredients: No fancy or hard-to-find items here—just pantry staples and fresh veggies you likely have on hand.
- Perfect for Parties: Whether it’s game day, potluck dinners, or casual get-togethers, this dip fits right in.
- Crowd-Pleaser: Kids, adults, picky eaters, and foodies alike all seem to agree—it’s a hit.
- Unbelievably Delicious: The combo of creamy beans, tangy sour cream, spicy salsa, and fresh toppings is next-level comfort food.
This recipe isn’t just another taco dip. The trick is in layering each component just right so every scoop has a perfect balance. Plus, I like to use a blend of cream cheese and sour cream for that ultra-smooth texture. The secret seasoning mix I toss into the beans adds a little extra zing that’s not too overpowering but just enough to keep everyone coming back for more.
Honestly, this dip has saved me at more than one party, turning a “what-do-I-bring” panic into a crowd-pleasing moment. You might find yourself making it your signature dish too!
Ingredients You Will Need
This recipe brings together simple, wholesome ingredients that create bold flavors and satisfying layers without any fuss. Most are pantry staples, and you can easily swap a few to suit your taste or dietary needs.
- For the base layer:
- 1 can (15 oz / 425 g) refried beans (I prefer Rosarita brand for smooth texture)
- 1 teaspoon taco seasoning (store-bought or homemade blend works great)
- For the creamy layer:
- 8 oz (225 g) cream cheese, softened (room temperature for easy spreading)
- 1 cup (240 ml) sour cream (full-fat gives best flavor, but low-fat works fine)
- 1 teaspoon lime juice (freshly squeezed adds brightness)
- ½ teaspoon garlic powder (optional, but recommended)
- For the salsa layer:
- 1 cup (240 g) chunky salsa (choose mild or spicy depending on preference)
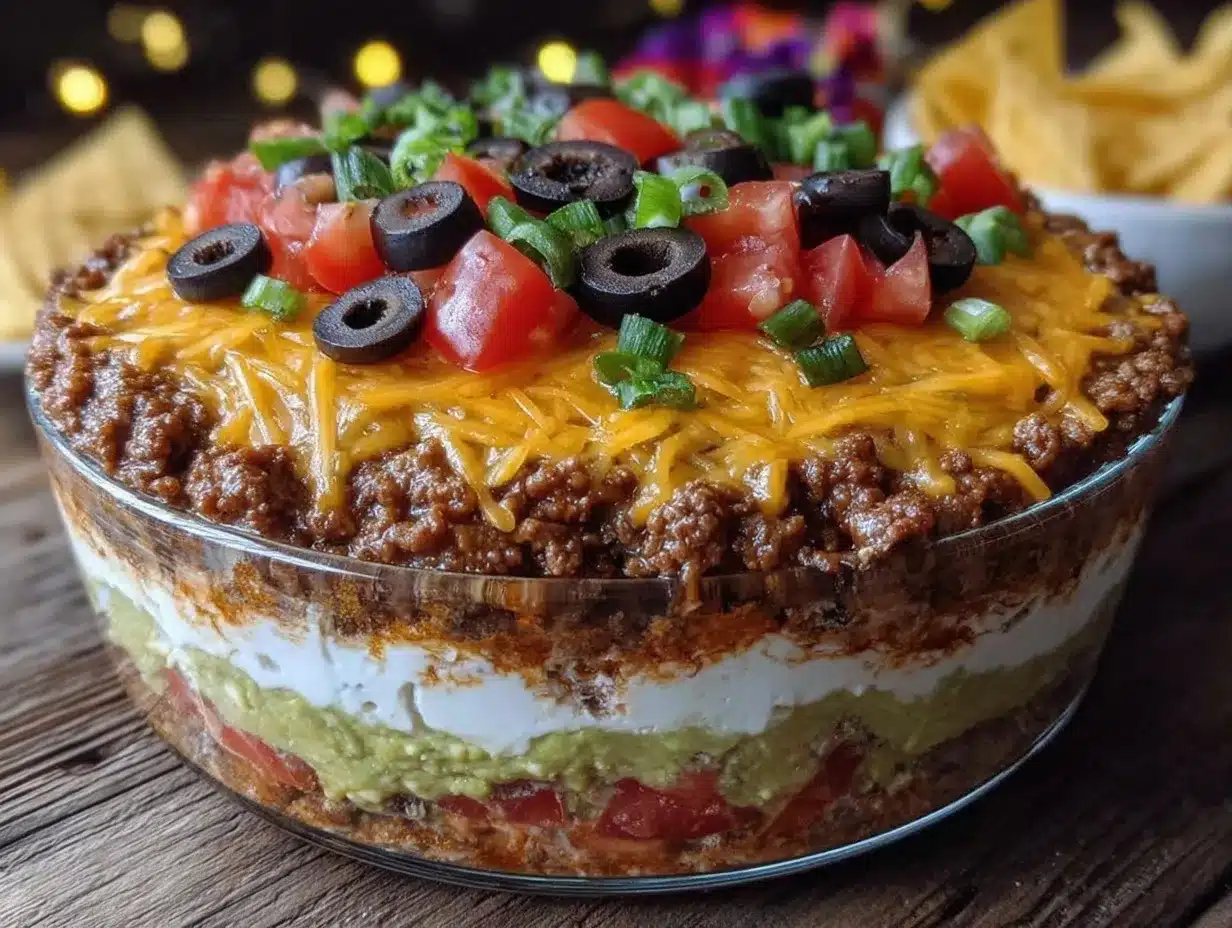
- Toppings:
- 1 cup (120 g) shredded cheddar cheese (or a Mexican blend)
- 1 medium tomato, diced (Roma or vine-ripened for best flavor)
- ½ cup (50 g) black olives, sliced
- 2 green onions, thinly sliced
- 1 small jalapeño, finely chopped (remove seeds for less heat)
- Fresh cilantro leaves for garnish (optional but adds a fresh pop)
Substitution ideas: You can swap cream cheese with a dairy-free alternative for a vegan-friendly dip. For a lower-carb option, use Greek yogurt instead of sour cream. And in summer months, fresh pico de gallo works beautifully in place of jarred salsa.
Equipment Needed
To make this layered taco dip, you don’t need anything fancy, which is part of the charm. I usually keep it simple:
- A medium mixing bowl for blending cream cheese and sour cream
- A small bowl for mixing refried beans with taco seasoning
- A spatula or spoon for spreading layers evenly
- A 9-inch (23 cm) round or square glass serving dish works best so you can see those beautiful layers
- A sharp knife and cutting board for prepping fresh toppings
If you don’t have a glass dish, any shallow bowl or platter with edges will do. I once made this in a disposable aluminum tray when I was short on time, and it worked just fine—just cover it tightly for transport.
For the cream cheese, I recommend softening it by leaving it out for about 30 minutes before mixing. This makes spreading a breeze and prevents lumps.
Preparation Method
- Prepare the bean layer: In a small bowl, stir the refried beans with taco seasoning until fully combined. This adds a flavorful kick that forms the base of the dip. Spread the mixture evenly in the bottom of your serving dish. This should take about 5 minutes.
- Mix the creamy layer: In a medium bowl, beat the softened cream cheese with sour cream, lime juice, and garlic powder using a spoon or small whisk until smooth and creamy. If you notice lumps, keep stirring until silky—this might take a couple of minutes. Spread this mixture gently over the bean layer, smoothing the surface. This step takes about 7 minutes.
- Add the salsa: Spoon the chunky salsa evenly over the creamy layer. Try not to press too hard; you want to keep the layers distinct. This will take about 2 minutes.
- Top with cheese: Sprinkle shredded cheddar cheese evenly over the salsa layer. The cheese melts slightly when served at room temperature, adding a lovely gooey texture.
- Prepare fresh toppings: Dice the tomato, slice the olives, chop green onions, and finely mince the jalapeño. Scatter these evenly on top of the cheese layer. Garnish with a few fresh cilantro leaves if desired. This final step adds color and freshness, taking about 5 minutes.
- Chill before serving (optional but recommended): Let the dip rest in the fridge for 30 minutes to an hour. This helps the flavors marry and makes the dip easier to scoop. I’ve skipped this step in a pinch, but honestly, it’s worth the wait.
Pro tip: When spreading layers, use the back of a spoon or an offset spatula for smoother results. If the cream cheese is too cold and stiff, it can tear the bean layer underneath, so patience here pays off.
And hey, if you accidentally drop a few olives on the floor like I did last time—don’t worry, just grab fresh ones. These little hiccups make cooking more fun, right?
Cooking Tips & Techniques
To get the best from your layered taco dip, a few tips from my kitchen experiments might save you some trouble:
- Softening cream cheese: This is key. Cold cream cheese leads to a lumpy, hard-to-spread layer. Let it sit out for at least 30 minutes or zap it in the microwave for 10 seconds (don’t melt it!).
- Seasoning the beans: Don’t skip the taco seasoning in the beans. It’s the flavor anchor that keeps the dip from tasting flat. I prefer to blend my own mix with chili powder, cumin, and smoked paprika for a smoky touch.
- Layer carefully: When adding salsa and toppings, be gentle so you don’t mix layers unintentionally. That distinct layering is what makes this dip a stunner visually and taste-wise.
- Timing: While you can make this dip ahead, don’t assemble too far in advance. Fresh tomatoes and jalapeños can release moisture and make the dip watery if left overnight.
- Multitasking: While the dip chills, prep some crunchy tortilla chips or fresh veggie sticks. This way, everything’s ready to go when guests arrive.
One time, I forgot the sour cream altogether (yikes) and tried to replace it with plain yogurt. The texture was off, and the dip didn’t have the usual creamy richness. Lesson learned: don’t skip the sour cream unless you have a good substitute!
Variations & Adaptations
If you want to switch things up or cater to different diets, here are a few ideas I’ve tried and loved:
- Vegetarian & Vegan: Use dairy-free cream cheese and sour cream alternatives, and swap shredded cheese with vegan cheese shreds. The dip still holds its flavor and texture beautifully.
- Spicy Kick: Add chopped pickled jalapeños or a dash of hot sauce into the salsa layer for extra heat. I sometimes sprinkle cayenne pepper in the bean layer too, which is a game changer for spice lovers.
- Seasonal Twist: In summer, fresh corn kernels and diced avocado make fantastic toppings. For winter, roasted red peppers and black beans add warmth and depth.
- Low-Carb Option: Serve the dip with sliced cucumber, bell pepper strips, or pork rinds instead of tortilla chips.
- My personal twist: Once, I mixed in a bit of crumbled cooked chorizo into the bean layer for a meaty boost. It was a hit at a casual guys’ night in.
Serving & Storage Suggestions
This layered taco dip is best served chilled or at room temperature. If you’re making it ahead, pull it out of the fridge about 15 minutes before serving—this softens the cream cheese and lets the flavors bloom.
Presentation-wise, a clear glass dish really shows off those colorful layers, but a rustic ceramic bowl brings cozy vibes. Either way, surround the dip with plenty of crunchy tortilla chips, sliced bell peppers, or sturdy veggie sticks.
Leftovers keep well in the fridge, tightly covered, for up to 3 days. The flavors actually deepen overnight, making it even better the next day. When reheating, I recommend serving cold or at room temp rather than warming it—heat can separate the layers and change the texture.
If you want to freeze it (I rarely do), freeze only the bean and cream cheese layers separately, then thaw and assemble fresh toppings when ready to serve.
Nutritional Information & Benefits
This taco dip combines protein-rich beans with calcium-packed dairy, making it a satisfying and balanced appetizer. Here’s a rough estimate per serving (based on 12 servings):
| Nutrient | Amount |
|---|---|
| Calories | 150–180 kcal |
| Protein | 6–8 grams |
| Fat | 10 grams |
| Carbohydrates | 12 grams |
| Fiber | 4 grams |
Beans provide fiber and plant-based protein, which helps keep you full longer. The fresh veggies add vitamins and antioxidants, and the dairy offers calcium and vitamin D. If you need gluten-free, this dip fits perfectly—just pair it with gluten-free chips or veggies.
I appreciate having a recipe that feels indulgent but still offers some nutritional perks, especially when entertaining a crowd.
Conclusion
If you’re looking for a simple, tasty, and foolproof party appetizer, this perfect layered taco dip is your new best friend. It’s a recipe that’s easy to customize, quick to prepare, and guaranteed to impress without breaking a sweat.
Whether you’re hosting a big game day gathering or just a casual evening with friends, this dip brings flavor, color, and that “wow” factor every time. Honestly, it’s one of those dishes I keep making because it nails the balance of creamy, spicy, and fresh in every bite.
Give it a try, tweak it to your liking, and let me know how it steals the spotlight at your next party. I love hearing your twists and stories—so drop a comment or share your version!
Happy dipping!
FAQs
Can I make this layered taco dip ahead of time?
Yes! You can prepare it a few hours in advance and chill it. Just add fresh toppings like tomatoes and jalapeños right before serving to keep them crisp.
What can I use instead of refried beans?
Black beans or pinto beans mashed with a fork and seasoned work well as a substitute if you prefer a chunkier texture.
Is there a way to make this dip less spicy?
Absolutely! Use mild salsa, omit jalapeños, and reduce or skip the taco seasoning to suit milder taste buds.
Can I freeze leftover taco dip?
It’s best not to freeze the fully assembled dip because the layers may separate. Instead, freeze the base layers separately and assemble fresh when thawed.
What’s the best way to serve this dip?
Serve with sturdy tortilla chips, sliced bell peppers, or crunchy veggies. Let it sit at room temperature for 15 minutes before serving for the best texture and flavor.
Pin This Recipe!

Perfect Layered Taco Dip Recipe Easy Party Appetizer to Impress

A quick and easy layered taco dip that combines creamy beans, tangy sour cream, spicy salsa, and fresh toppings for a crowd-pleasing party appetizer.
- Prep Time: 15 minutes
- Cook Time: 0 minutes
- Total Time: 45 minutes
- Yield: 12 servings 1x
- Category: Appetizer
- Cuisine: Mexican
Ingredients
- 1 can (15 oz / 425 g) refried beans
- 1 teaspoon taco seasoning
- 8 oz (225 g) cream cheese, softened
- 1 cup (240 ml) sour cream
- 1 teaspoon lime juice
- ½ teaspoon garlic powder (optional)
- 1 cup (240 g) chunky salsa
- 1 cup (120 g) shredded cheddar cheese
- 1 medium tomato, diced
- ½ cup (50 g) black olives, sliced
- 2 green onions, thinly sliced
- 1 small jalapeño, finely chopped
- Fresh cilantro leaves for garnish (optional)
Instructions
- In a small bowl, stir the refried beans with taco seasoning until fully combined. Spread the mixture evenly in the bottom of your serving dish.
- In a medium bowl, beat the softened cream cheese with sour cream, lime juice, and garlic powder until smooth and creamy. Spread this mixture gently over the bean layer.
- Spoon the chunky salsa evenly over the creamy layer without pressing too hard.
- Sprinkle shredded cheddar cheese evenly over the salsa layer.
- Dice the tomato, slice the olives, chop green onions, and finely mince the jalapeño. Scatter these evenly on top of the cheese layer and garnish with cilantro leaves if desired.
- Chill the dip in the fridge for 30 minutes to an hour before serving to let the flavors marry and make it easier to scoop (optional but recommended).
Notes
Soften cream cheese before mixing for easy spreading. Use the back of a spoon or offset spatula to spread layers smoothly. Chill dip before serving for best flavor and texture. Can substitute dairy-free cream cheese and sour cream for vegan version. Avoid assembling too far in advance to prevent watery layers.
Nutrition
- Serving Size: About 1/12th of the
- Calories: 150180
- Fat: 10
- Carbohydrates: 12
- Fiber: 4
- Protein: 68
Keywords: layered taco dip, party appetizer, easy dip recipe, taco dip, crowd-pleaser, quick appetizer, creamy dip, spicy dip